KADA MCP for Copilot Studio (Beta)
Kada provides a MCP integration for Copilot Studio.
You must request access to the Kada MCP beta. Reach out to your Kada account manager for access.
Prerequisites
You must have access to Copilot Studio and licensed for Microsoft 365 Copilot
Kada MCP API key
Kada MCP Server URL endpoint (e.g.,
https://demo.kada.ai/mcp)Kada Agent knowledge files
kada_default_columns.txtlineage_rules.txtsolr_kada_search_roles.txt
Step 1: Adding the MCP Server as a Copilot Agent Tool
Log into Copilot studio - copilotstudio.microsoft.com/
Click on Tools in the navigation pane
Click Add a tool
Select
+ New toolSelect Model Context Protocol
Step 2: Add in MCP Server Information
Provide the following values in the MCP configuration form
Field | Example | Description |
|---|---|---|
Server name |
| Short, clear name for the MCP server |
Server description |
| Detailed description - the agent uses this to decide when to call the MCP server |
Server URL |
| Your MCP server endpoint provided by Kada (must include |
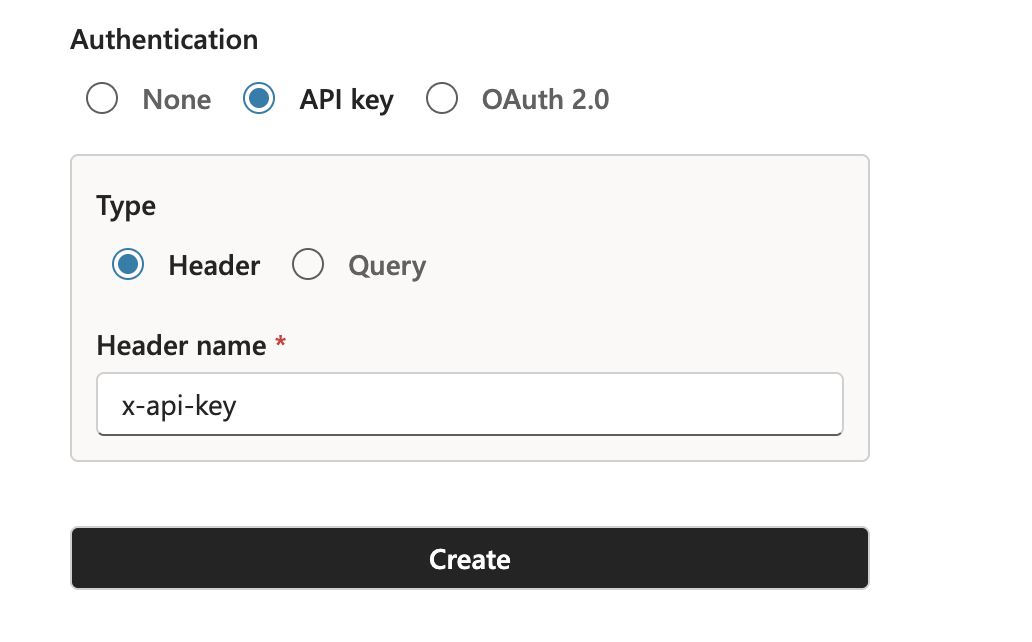
Step 3: Configure MCP Authentication
Under Authentication, select API key
For Type, select Header
For Header name, enter:
x-api-keyClick Create
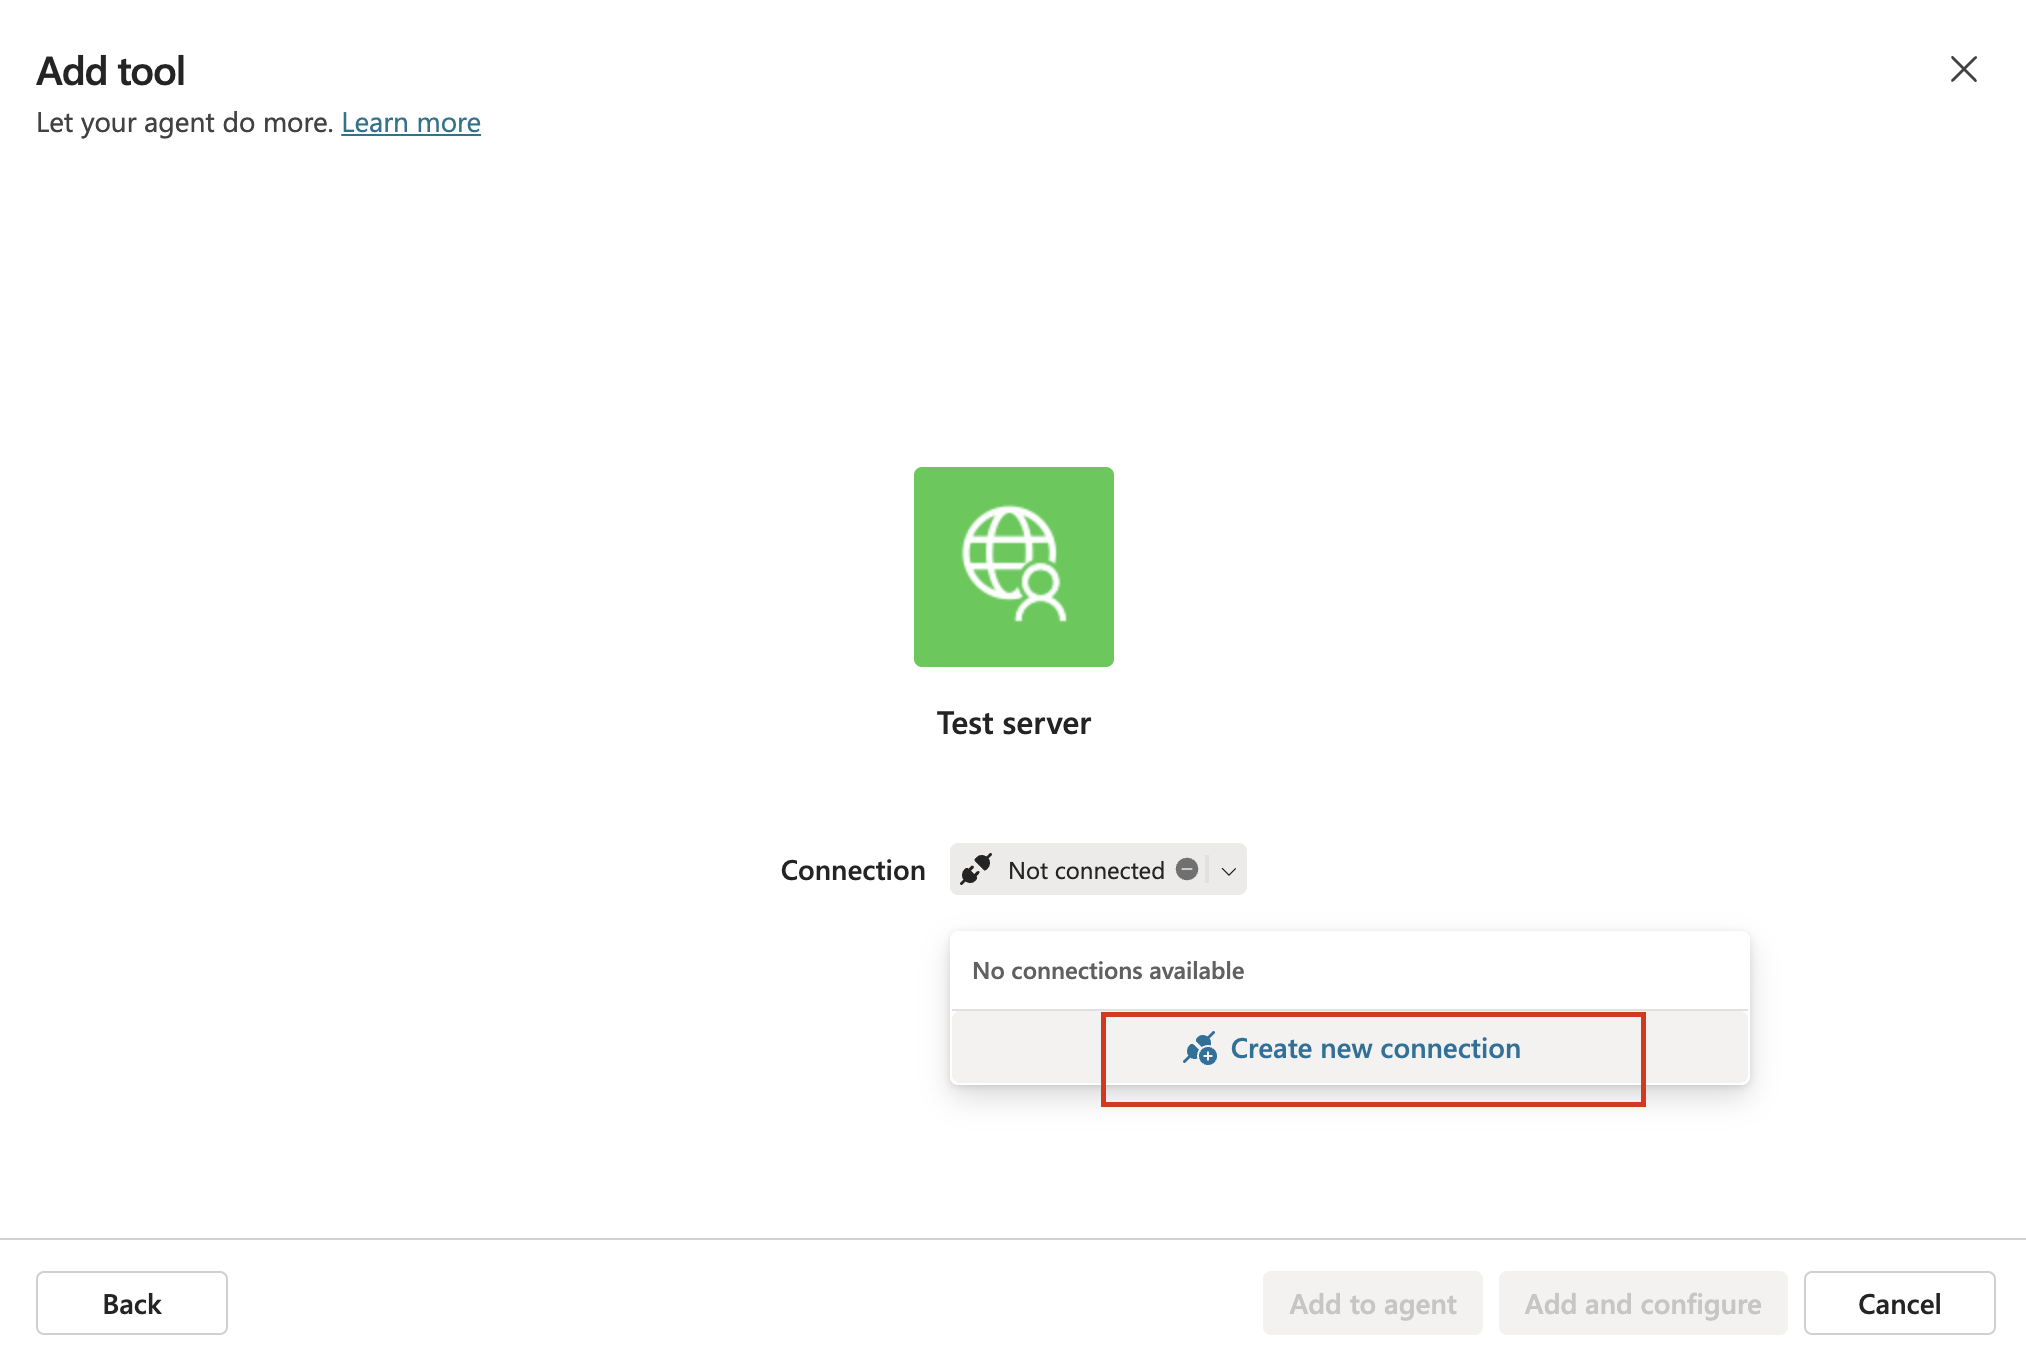
Step 4: Create MCP Connection
After creating the server configuration, you'll see the "Add tool" page:
The server appears but shows "Not connected"
Click Create new connection
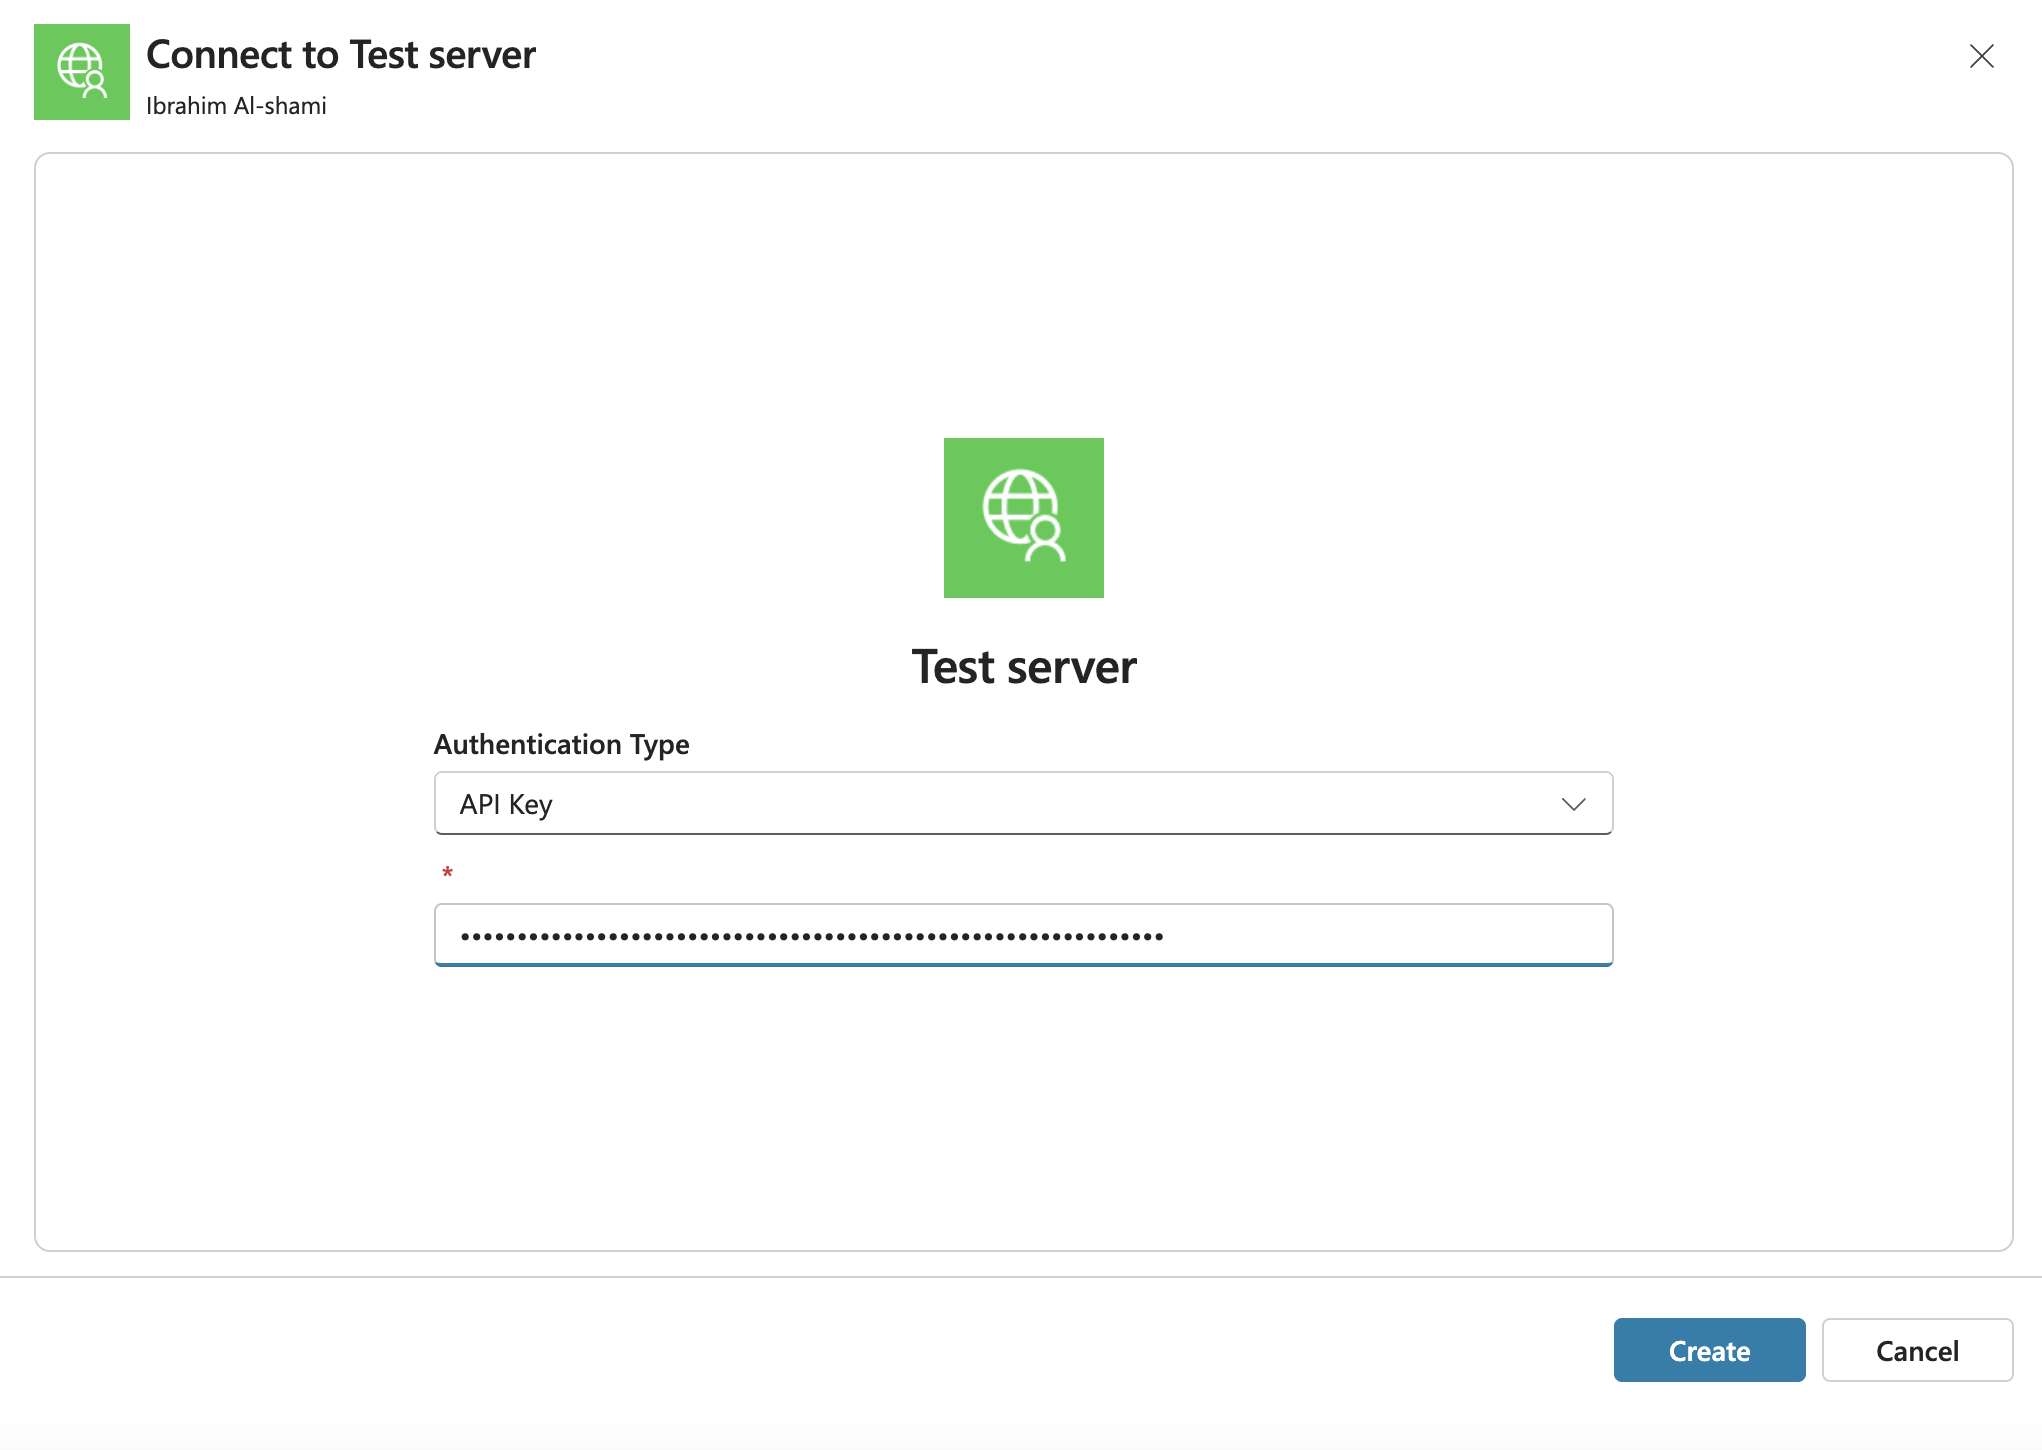
In the connection dialog:
Authentication Type is pre-selected as "API Key"
Enter your API key provided by Kada
Click Create
Step 5: Add to MCP to your Agent
After creating the connection, you'll return to the "Add tool" page
Select your newly created connection from the Connection dropdown
Click Add and configure

The Kada MCP server is now available to your agent.
Step 6: Configuring your agent
Click on Agents in the navigation pane
Click Add agent
In the agent creation interface, click on the Configure tab
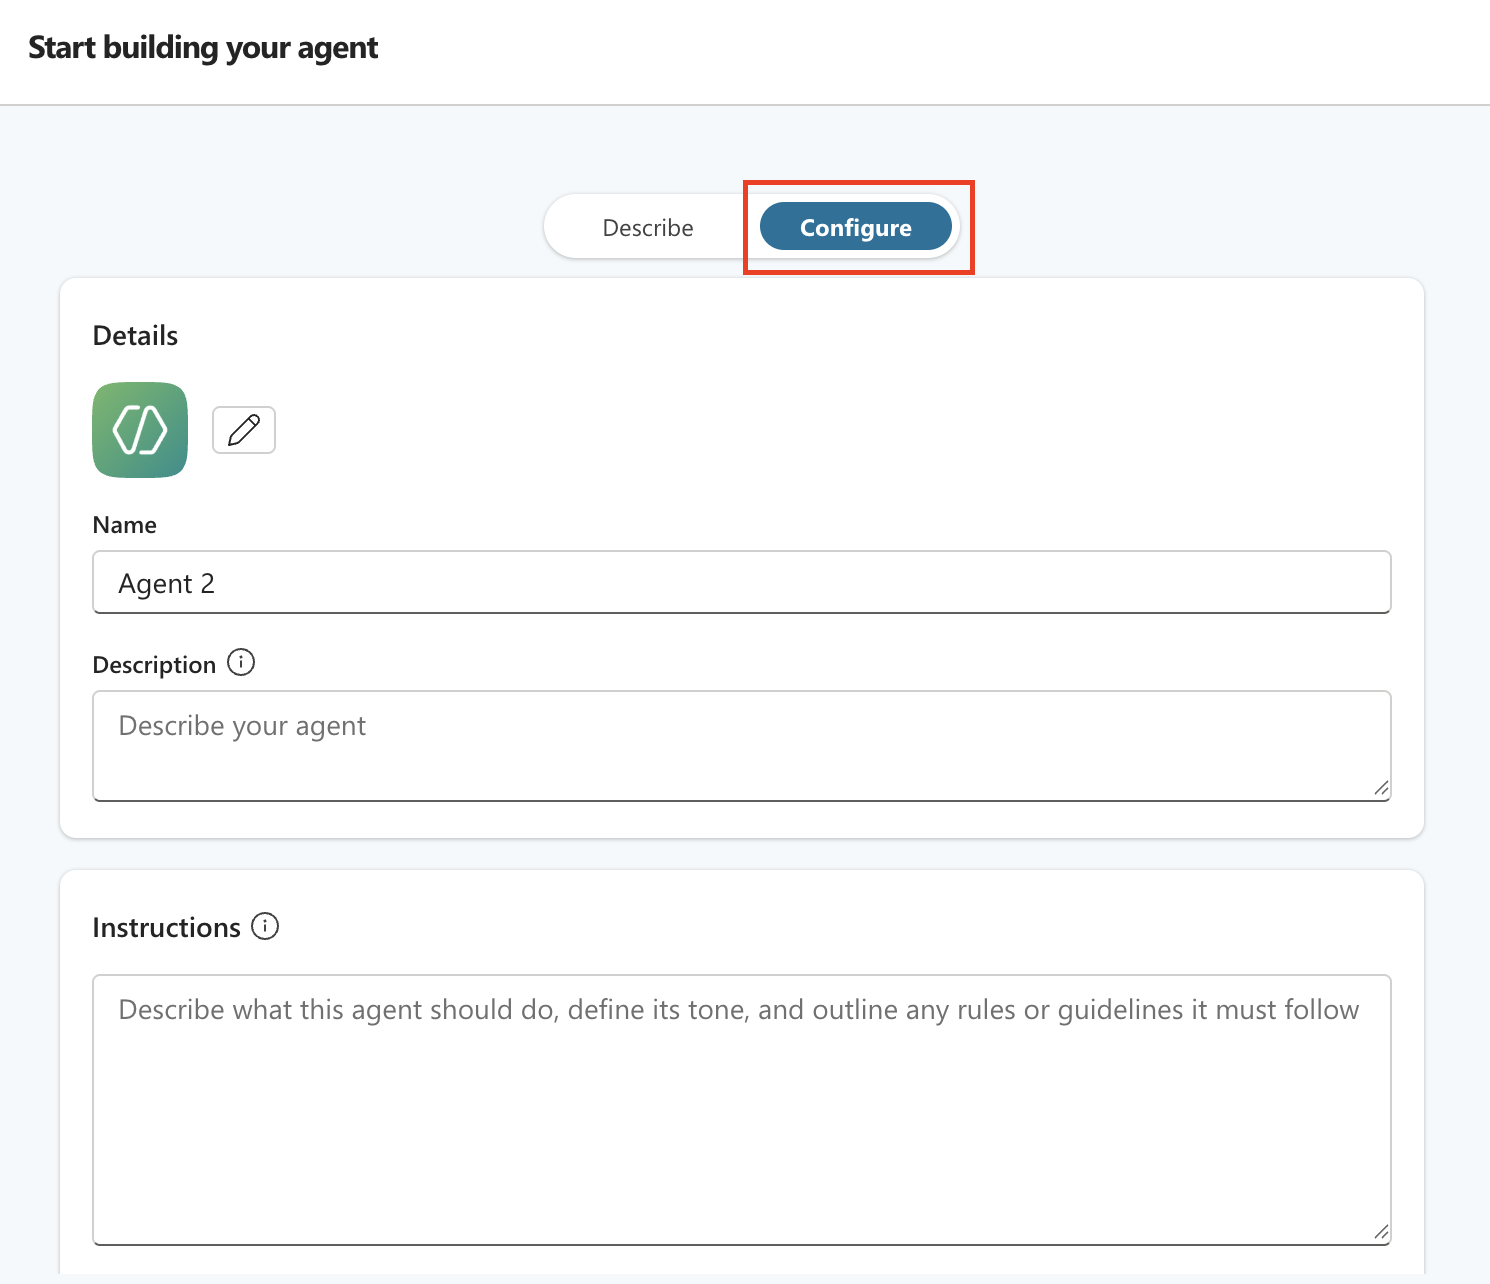
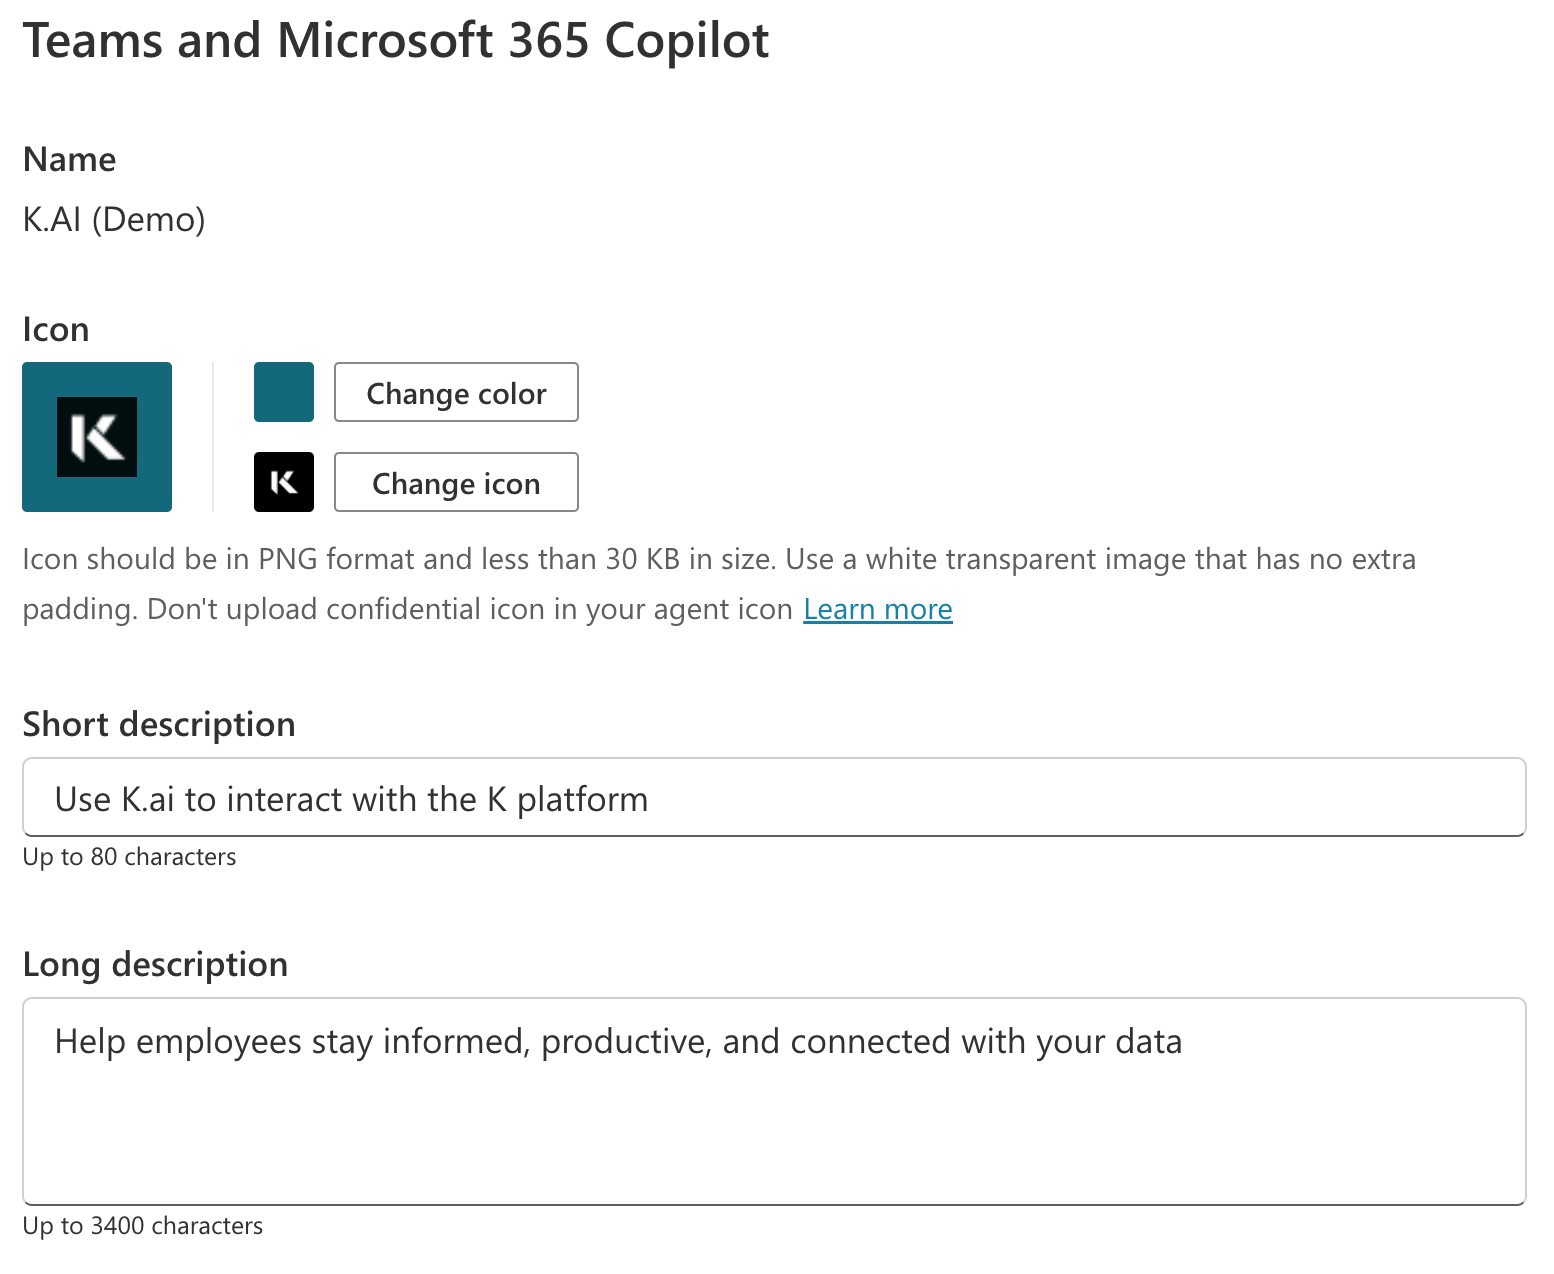
Configure Agent Details:
Name: Enter a descriptive name for your agent (e.g., "K.AI")
Description: Add a brief description of what this agent does.
Instructions: Paste the instructions provided by KADA in the Instructions field.
Logo: <TBC>
Click Create
Step 7: Configuring your Agent
Navigate to your agent from Agents in the navigation pane.
In the Overview tab go to the Instructions section. Click Edit
Enter the following instructions
Always search Kada by calling the KADA MCP SERVER.
When you construct the solr query always use 'kada_default_columns.txt' and 'solr_kada_search_roles.txt' to use the correct fields names in order to construct a valid solr query.
Do not explain your approach.
Always return the response to the question asked by using the result from Kada.
Do not include citation references in your response. When including hyperlinks, do not display the full URL. Instead, use Markdown link syntax with the word LINK as the display text.
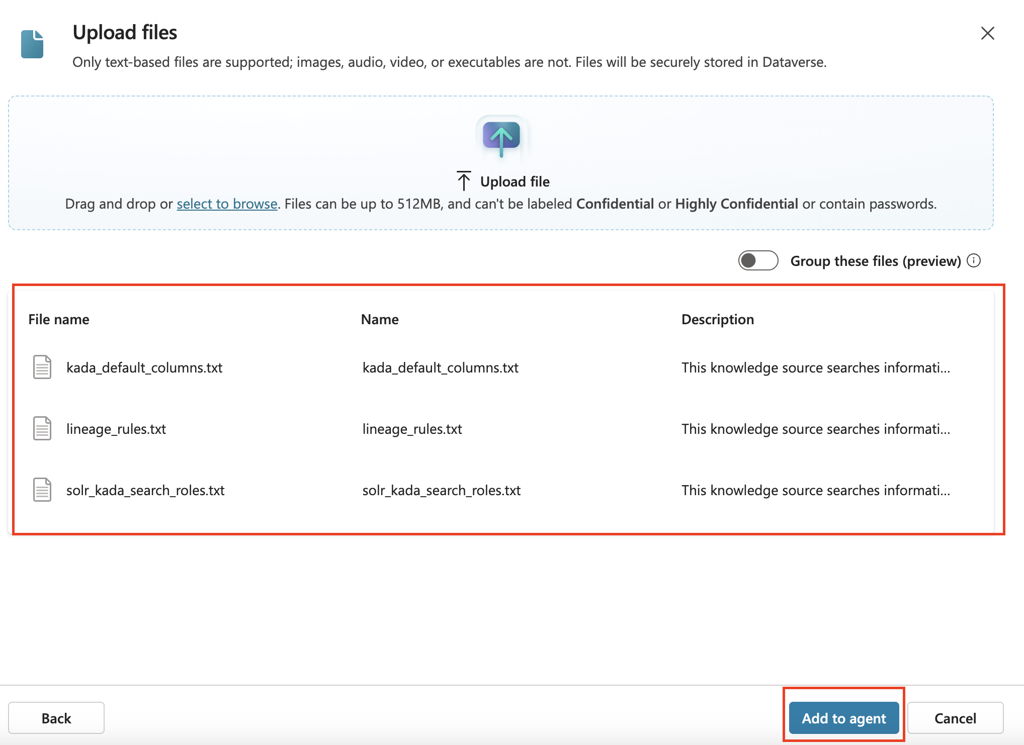
Click SaveGo to the Knowledge tab. Click the + Add Knowledge button.
In the "Upload files" dialog:
Click Upload file or drag and drop the files provided by KADA.
Add KADA provided knowledge files:
kada_default_columns.txtlineage_rules.txtsolr_kada_search_roles.txt
Click Add to agent
Go to the Tools tab. Click on the Tool added in Step 5
In the Details section, click on Additional details to expand the options
Set Credentials to use to Maker-provided credentials
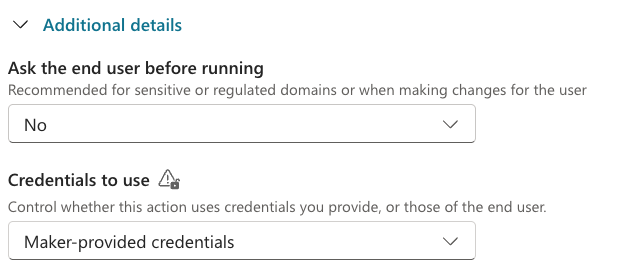
Click on Publish to complete the setup of your agent
Step 8: Testing your agent
Test your agent to see how it responds to the following questions
Question | Expected response |
|---|---|
What report should I use for <use case> | Agent returns accurate list of reports suitable for the use case |
Who is the owner of this report? | Agent returns the correct owner for the report |
If the agent provides inaccurate responses, consider tuning the instructions.
Please advise the Kada account manager so your feedback can be incorporated in the MCP / Knowledge files.
Step 9: Deploying your agent to Teams
Navigate to your agent from Agents in the navigation pane.
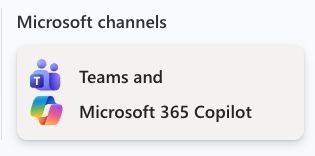
Go to the Channels tab. Click on Teams & Microsoft 365 Copilot
Select the checkbox if you want to make the agent available in Microsoft 365 Copilot.
Click Add Channel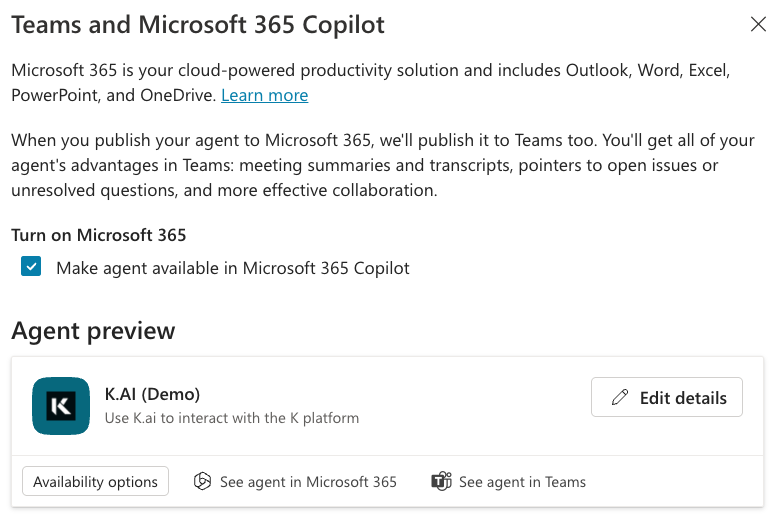
Click on Edit Details in the Agent Preview section
Add an icon, change the colour and update the description. Click Save
Step 10: Approving the agent deployment in Teams
Requires Microsoft Admin role
Go to Teams apps in the left navigation pane
In the apps list. Click on the Filter icon. Apply the following filter
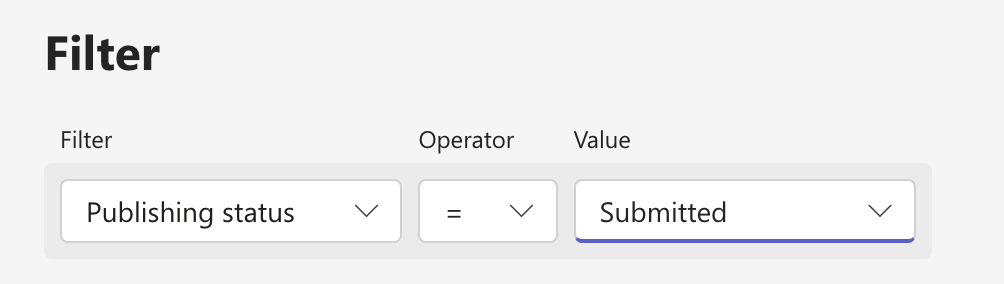
Click on your app. Click Publish
Step 10: Adding your agent in Teams
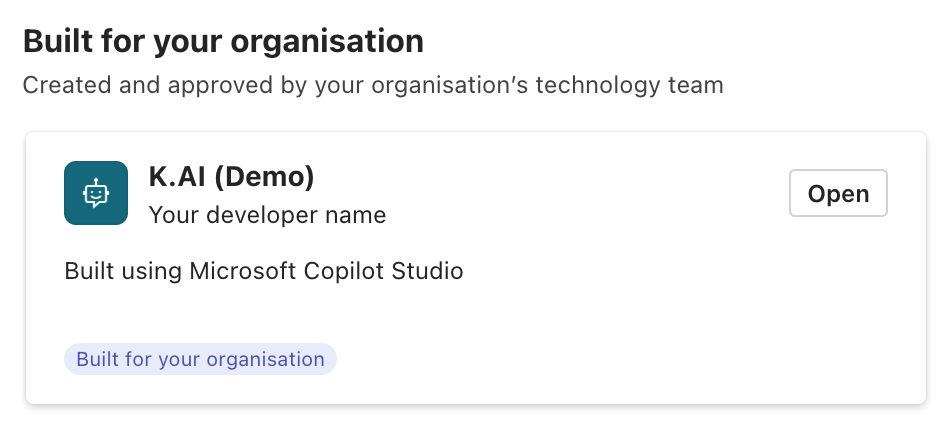
Open your Microsoft Teams application
Click on Apps in the left navigation pane
Click on the Agent you deployed. It will be located in the Built for your organisation section
Troubleshooting
Connection Issues
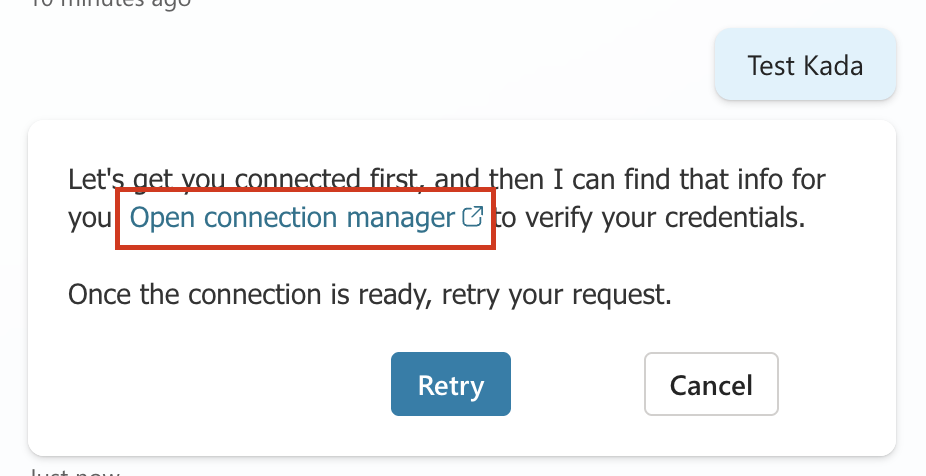
If you see an error message saying "Let's get you connected first, and then I can find that info for you. Open connection manager to verify your credentials. Once the connection is ready, retry your request."
Fix the connection:
Click Open connection manager (or go to Connections via the left navigation)
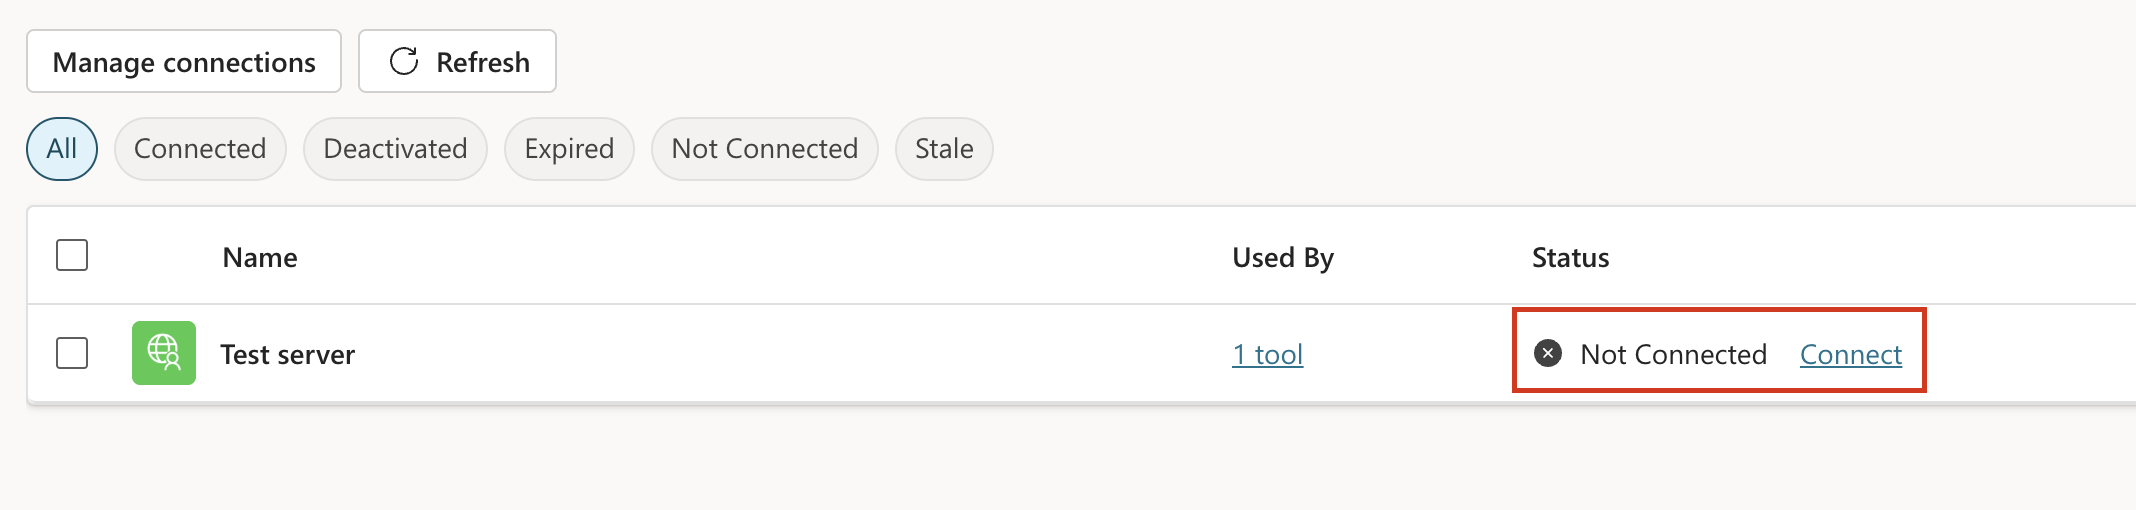
Find "Test server KADA" in the connections list
Status shows "Not Connected"
Click Connect button
Pick The KADA MCP connection.
Click Submit
Once Status change to Connected, go back to your agent chat and try again.