Microsoft Dynamics 365
This page will walkthrough the setup of Dynamics in K using the direct connect method.
This integration has been tested with Microsoft Dataverse Web API v9.2
Integration details
Scope | Included | Comments |
|---|---|---|
Metadata | YES | |
Lineage | NO | |
Usage | NO | |
Sensitive Data Scanner | N/A |
Integration with Dynamics will extract metadata for every table unless a subset of tables are specified. It is recommended that you specify the list of tables to synchronise.
Step 1: Registering A Kada App in Azure AD
This step is performed by the Azure AD Admin.
Skip this step if you have already configured a Kada app in Azure AD for Entra SSO or Power BI integration
Log in to your company’s Azure Portal and open the Azure Active Directory page
Select App Registration in the side panel and click New registration
Complete the registration form
Name: Enter a name for the integration e.g. KADA Dynamics API Integration
Supported account types: Select Accounts in this organisation directory only
Redirect URL: Add Web / https://www.kada.ai
Click Register to complete the registration
Click on the newly created KADA Dynamics API Integration App
Save the Application (client) ID and Directory (tenant) ID for use in a later step
Click on Endpoints and save the URL for OpenID Connect metadata document for use in a later step
Select Certificates & secrets in the side panel and click New client secret
Complete the new secret form and save the Secret Value for use in a later step
Make sure you send the following information to the K Admin so that they can complete the next process.
Application (client) ID
Directory (tenant) ID
Secret Value
Step 2: Kada App access to Dynamics API
This step is performed by a Dynamics admin
Log in to your company’s Dynamics / Power Apps
Select Environments and click on the Environment that you want to load into K.
Click on Settings
Select on Users + permissions and click on Application Users
Click New App User. In the slide out:
Click Add an App. Search for the App that was created in Step 1 and add it
Select an appropriate org
Add the Service Reader role
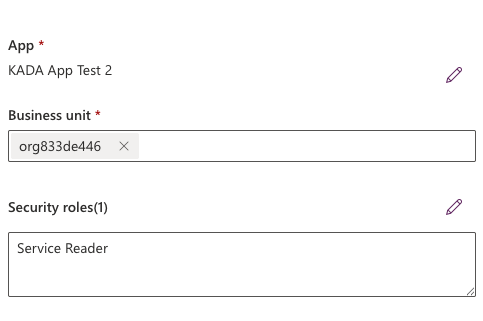
Click Create
Step 3: Obtain the Web API endpoint
This step is performed by a Dynamics admin
Log in to your company’s Power App Maker
Select Settings. Click on Developer resources
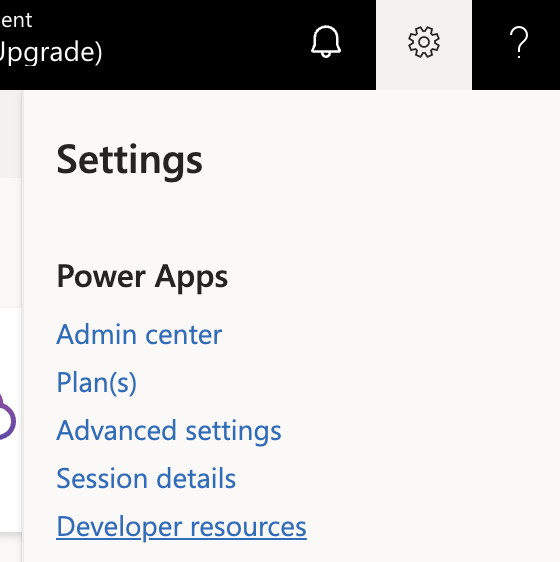
Save the Web API endpoint for use in a later step
Step 4: Review the list of entities to be loaded into K (Optional)
This step is performed by a Dynamics admin
The Dynamics integration will extract all entities (and fields). This may include some entities that you do not want to load into K. K supports extracting a list of entities (and associated fields) as well.
To review the list of entities you want to extract:
Log in to your company’s Power App Maker
Select Tables
Take down the list of table names that you want to include in the extract

Step 5: Create the Source in K
This and the following step is performed by a K admin
Create a source in K
Go to Settings, Select Sources and click Add Source
Select Microsoft Dynamics as the Source type
Select Direct Connect and add your Dynamics Source Settings
Name: Give the Microsoft Dynamics source a name in K.
Host: Enter a hostname for your Microsoft Dynamics instance. You may consider using the URL from the Web API endpoint from Step 3 (e.g.
https://<org-id>.api.crm6.dynamics.com)Resource: Enter the Web API endpoint from Step 3 (e.g.
https://<org-id>.api.crm6.dynamics.com/api/data/v9.2)Entity: Enter a comma separated list of tables to be synchronised.
Data masking: Applies data masking to any logs extracted (optional)
Metadata only: Only extracts metadata (optional)
Click Save & Next
Setup your Connection details from Step 1
Tenant ID
Client ID
Client Secret
Test your connection and click Next
Step 3: Schedule Microsoft Dynamics source load
Select Platform Settings in the side bar
In the pop-out side panel, under Integrations click on Sources
Locate your new Microsoft Dynamics Source and click on the Schedule Settings (clock) icon to set the schedule
Step 4: Manually run an ad hoc load to test Microsoft Dynamics
Next to your new Source, click on the Run manual load icon
Confirm how your want the manual run to be completed
After the source load is triggered, a pop up bar will appear taking you to the Monitor tab in the Batch Manager page. This is the usual page you visit to view the progress of source loads
A manual source load will also require a manual run of
DAILY
GATHER_METRICS_AND_STATS
To load all metrics and indexes with the manually loaded metadata. These can be found in the Batch Manager page
Troubleshooting failed loads
If the job failed at the extraction step
Check the error. Contact KADA Support if required.
Rerun the source job
If the job failed at the load step, the landing folder failed directory will contain the file with issues.
Find the bad record and fix the file
Rerun the source job