Power BI (via Collector method) - v3.2.0
About Collectors
Collectors are extractors that are developed and managed by you (A customer of K).
KADA provides python libraries that customers can use to quickly deploy a Collector.
Why you should use a Collector
There are several reasons why you may use a collector vs the direct connect extractor:
You are using the KADA SaaS offering and it cannot connect to your sources due to firewall restrictions
You want to push metadata to KADA rather than allow it pull data for Security reasons
You want to inspect the metadata before pushing it to K
Using a collector requires you to manage
Deploying and orchestrating the extract code
Managing a high water mark so the extract only pull the latest metadata
Storing and pushing the extracts to your K instance.
Pre-requisites
Collector Server Minimum Requirements
For the collector to operate effectively, it will need to be deployed on a server with the below minimum specifications:
CPU: 2 vCPU
Memory: 8GB
Storage: 30GB (depends on historical data extracted)
OS: unix distro e.g. RHEL preferred but can also work with Windows Server.
Python 3.10.x or later
Access to K landing directory
PowerBI Requirements
Access to Power BI
Follow the steps in PowerBI to setup a Service Principal with access to Power BI.
You will need for the setup
Application (client) ID
Directory (tenant) ID
Secret Value
Lineage limitations in regards to Dataset Fields to Pages, lineage for this is dependant on the ability to export the PowerBI Report to analyse the pbix file. If we are unable to download the pbix file, this lineage will be missing for that report.
https://learn.microsoft.com/en-us/power-bi/create-reports/service-export-to-pbix
Step 1: Create the Source in K
Create a Power BI source in K
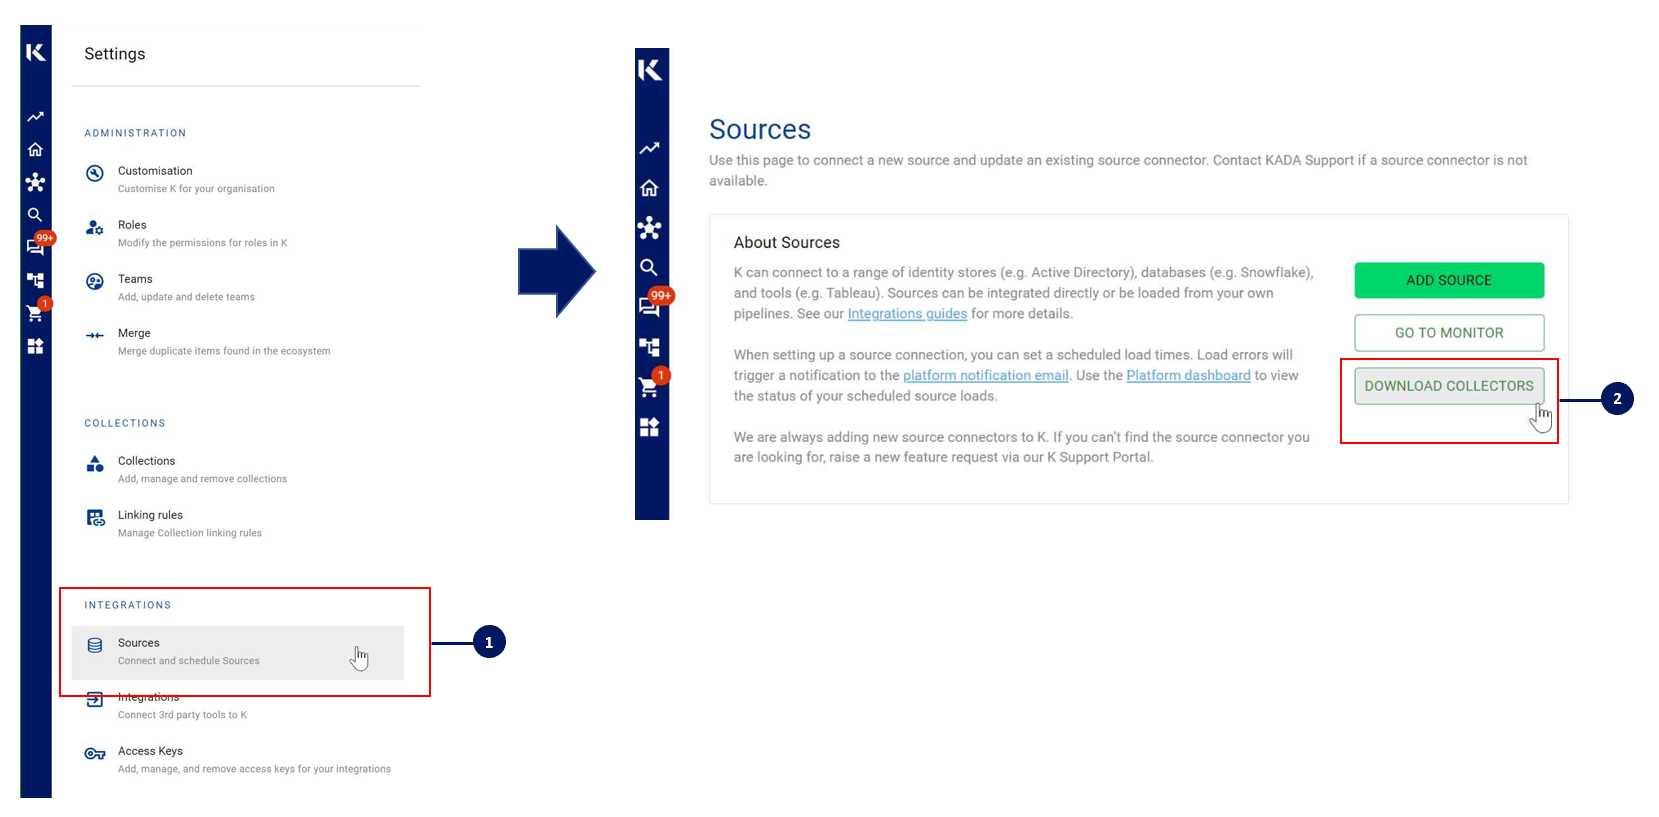
Go to Settings, Select Sources and click Add Source
Select “Load from File” option
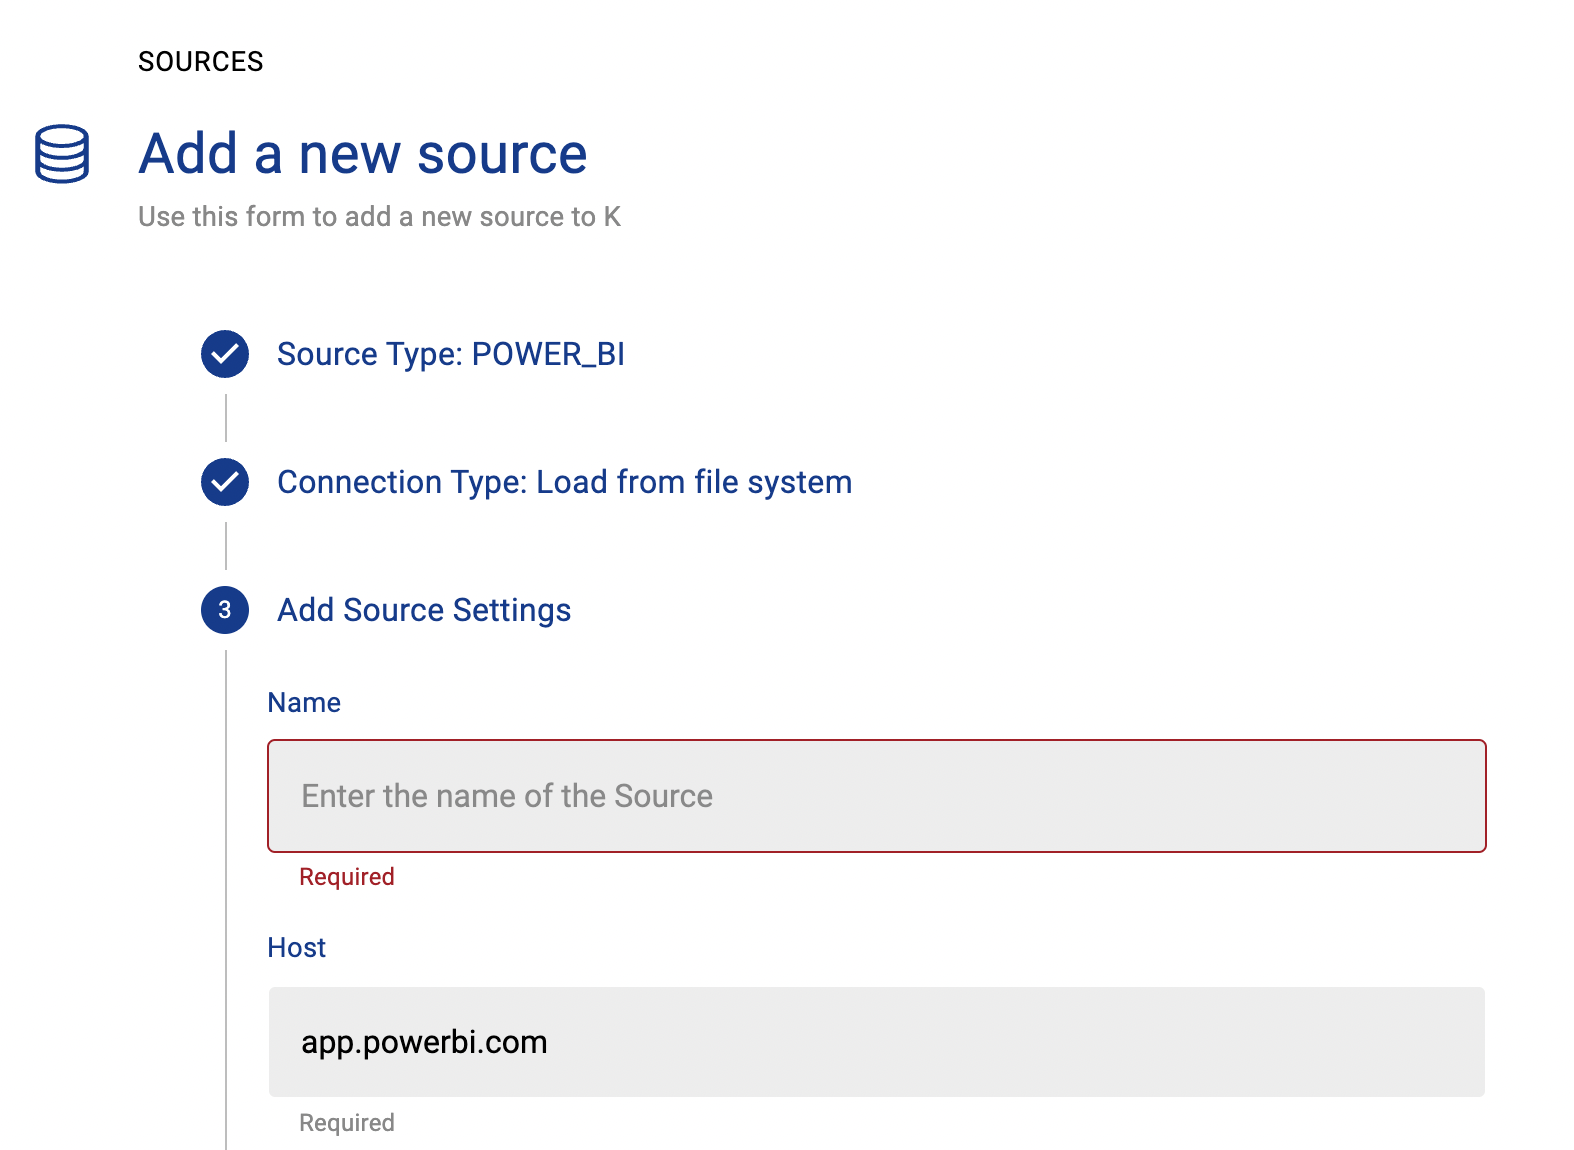
Give the source a Name - e.g. PowerBI Production
Add the Host name for the PowerBI Server
Click Finish Setup
Step 2: Getting Access to the Source Landing Directory
When using a Collector you will push metadata to a K landing directory.
To find your landing directory you will need to
Go to Platform Settings - Settings. Note down the value of this setting
If using Azure: storage_azure_storage_account
if using AWS:
storage_root_folder - the AWS s3 bucket
storage_aws_region - the region where the AWS s3 bucket is hosted
Go to Sources - Edit the Source you have configured. Note down the landing directory in the About this Source section
To connect to the landing directory you will need
If using Azure: a SAS token to push data to the landing directory. Request this from KADA Support (support@kada.ai)
if using AWS:
an Access key and Secret. Request this from KADA Support (support@kada.ai)
OR provide your IAM role to KADA Support to provision access.
Step 3: Install the Collector
It is recommended to use a python environment such as pyenv or pipenv if you are not intending to install this package at the system level.
Some python packages also have dependencies on the OS level packages, so you may be required to install additional OS packages if the below fails to install.
You can download the latest Core Library and whl via Platform Settings → Sources → Download Collectors
Run the following command to install the collector.
pip install kada_collectors_extractors_<version>-none-any.whlYou will also need to install the common library kada_collectors_lib for this collector to function properly.
pip install kada_collectors_lib-<version>-none-any.whlStep 4: Configure the Collector
The collector requires a set of parameters to connect to and extract metadata from Power BI
FIELD | FIELD TYPE | DESCRIPTION | EXAMPLE |
|---|---|---|---|
client | string | Onboarded client in Azure to access powerbi | |
secret | string | Onboarded client secret in Azure to access powerbi | |
tenant | string | Tenant ID of where powerbi exists | |
output_path | string | Absolute path to the output location where files are to be written | “/tmp/output” |
mask | boolean | To enable masking or not | true |
timeout | integer | Timeout in seconds allowed against the powerbi APIs, for slower connections we recommend 30, default is 20 | 20 |
export_timeout | integer | Timeout in seconds allowed against the powerbi export pbix APIs, we recommend not setting this lower than 120 | 120 |
mapping | JSON | Mapping file of data source names against the onboarded host and database name in K | Assuming I have a “myDSN” data source name in powerbi, I’ll map it to host “myhost” and database “mydatabase” onboarded in K, snowflake type references are handled automatically
CODE
|
filter_flag | boolean | Should we be filtering out workspaces based on filter_workspaces as a whitelist? | false |
filter_workspaces | list<string> | List of workspace names that should be processed, this is case insensitive. Note that personal workspaces are excluded globally and will never be included even if you include it here. | [“data lab”, “analysis models”] |
compress | boolean | To gzip the output or not | true |
These parameters can be added directly into the run or you can use pass the parameters in via a JSON file. The following is an example you can use that is included in the example run code below.
kada_powerbi_extractor_config.json
{
    "client": "",
    "secret": "",
    "tenant": "",
    "output_path": "/tmp/output",
    "mask": true,
    "timeout": 20,
    "export_timeout": 120,
    "filter_flag": true,
    "filter_workspaces": []
    "mapping": {
        "myDSN": {
            "host": "myhost",
            "database": "mydatabase"
        }
    },
    "compress": true
}
Step 5: Run the Collector
The following code is an example of how to run the extractor. You may need to uplift this code to meet any code standards at your organisation.
This can be executed in any python environment where the whl has been installed.
This code sample uses the kada_powerbi_extractor_config.json for handling the configuration details
import os
import argparse
from kada_collectors.extractors.utils import load_config, get_hwm, publish_hwm, get_generic_logger
from kada_collectors.extractors.powerbi import Extractor

get_generic_logger('root') # Set to use the root logger, you can change the context accordingly or define your own logger

_type = 'powerbi'
dirname = os.path.dirname(__file__)
filename = os.path.join(dirname, 'kada_{}_extractor_config.json'.format(_type))

parser = argparse.ArgumentParser(description='KADA PowerBI Extractor.')
parser.add_argument('--config', '-c', dest='config', default=filename, help='Location of the configuration json, default is the config json in the same directory as the script.')
parser.add_argument('--name', '-n', dest='name', default=_type, help='Name of the collector instance.')
args = parser.parse_args()

start_hwm, end_hwm = get_hwm(args.name)

ext = Extractor(**load_config(args.config))
ext.test_connection()
ext.run(**{"start_hwm": start_hwm, "end_hwm": end_hwm})

publish_hwm(args.name, end_hwm)
Advance options:
If you wish to maintain your own high water mark files elsewhere you can use the above section’s script as a guide on how to call the extractor. The configuration file is simply the keyword arguments in JSON format. Refer to this document for more information Collector Integration General Notes | Storing-HWM-in-another-location
If you are handling external arguments of the runner yourself, you’ll need to consider additional items for the run method. Refer to this document for more information Collector Integration General Notes | The-run-method
class Extractor(client: str = None, secret: str = None, tenant: str = None, \
  mapping: dict = {}, filter_flag: bool = False, filter_workspaces: list = [], \
  timeout: int = 10, export_timeout: int=120, output_path: str = './output', \
  mask: bool = False, compress: bool = False) -> None
client: The Client ID for the registered application for access to PowerBI APIs
secret: The Secret for the registered application for access to PowerBI APIs
tenant: The Tenant ID for the registered application for access to PowerBI APIs
mapping: Dict of DNS to database and hostnames
filter_flag: Should we be filtering out workspaces based on filter_workspaces as a whitelist
filter_workspaces: whitelist of workspaces
timeout: Timeout for the API call
export_timeout: Timeout in seconds for exporting pbix files, defaults to 120 seconds
output_path: full or relative path to where the outputs should go
mask: To mask the META/DATABASE_LOG files or not
compress: To gzip output files or not
Step 6: Check the Collector Outputs
K Extracts
A set of files (eg metadata, databaselog, linkages, events etc) will be generated. These files will appear in the output_path directory you set in the configuration details
High Water Mark File
A high water mark file is created in the same directory as the execution called powerbi_hwm.txt and produce files according to the configuration JSON. This file is only produced if you call the publish_hwm method.
Step 7: Push the Extracts to K
Once the files have been validated, you can push the files to the K landing directory.
You can use Azure Storage Explorer if you want to initially do this manually. You can push the files using python as well (see Airflow example below)
Example: Using Airflow to orchestrate the Extract and Push to K
The following example is how you can orchestrate the Tableau collector using Airflow and push the files to K hosted on Azure. The code is not expected to be used as-is but as a template for your own DAG.
# built-in
import os

# Installed
from airflow.operators.python_operator import PythonOperator
from airflow.models.dag import DAG
from airflow.operators.dummy import DummyOperator
from airflow.utils.dates import days_ago
from airflow.utils.task_group import TaskGroup

from plugins.utils.azure_blob_storage import AzureBlobStorage

from kada_collectors.extractors.utils import load_config, get_hwm, publish_hwm, get_generic_logger
from kada_collectors.extractors.tableau import Extractor

# To be configed by the customer.
# Note variables may change if using a different object store.
KADA_SAS_TOKEN = os.getenv("KADA_SAS_TOKEN")
KADA_CONTAINER = ""
KADA_STORAGE_ACCOUNT = ""
KADA_LANDING_PATH = "lz/tableau/landing"
KADA_EXTRACTOR_CONFIG = {
    "server_address": "http://tabserver",
    "username": "user",
    "password": "password",
    "sites": [],
    "db_host": "tabserver",
    "db_username": "repo_user",
    "db_password": "repo_password",
    "db_port": 8060,
    "db_name": "workgroup",
    "meta_only": False,
    "retries": 5,
    "dry_run": False,
    "output_path": "/set/to/output/path",
    "mask": True,
    "mapping": {}
}

# To be implemented by the customer.
# Upload to your landing zone storage.
# Change '.csv' to '.csv.gz' if you set compress = true in the config
def upload():
  output = KADA_EXTRACTOR_CONFIG['output_path']
  for filename in os.listdir(output):
      if filename.endswith('.csv'):
        file_to_upload_path = os.path.join(output, filename)

        AzureBlobStorage.upload_file_sas_token(
            client=KADA_SAS_TOKEN,
            storage_account=KADA_STORAGE_ACCOUNT,
            container=KADA_CONTAINER,
            blob=f'{KADA_LANDING_PATH}/{filename}',
            local_path=file_to_upload_path
        )

with DAG(dag_id="taskgroup_example", start_date=days_ago(1)) as dag:

    # To be implemented by the customer.
    # Retrieve the timestamp from the prior run
    start_hwm = 'YYYY-MM-DD HH:mm:SS'
    end_hwm = 'YYYY-MM-DD HH:mm:SS' # timestamp now

    ext = Extractor(**KADA_EXTRACTOR_CONFIG)

    start = DummyOperator(task_id="start")

    with TaskGroup("taskgroup_1", tooltip="extract tableau and upload") as extract_upload:
        task_1 = PythonOperator(
            task_id="extract_tableau",
            python_callable=ext.run,
            op_kwargs={"start_hwm": start_hwm, "end_hwm": end_hwm},
            provide_context=True,
        )

        task_2 = PythonOperator(
            task_id="upload_extracts",
            python_callable=upload,
            op_kwargs={},
            provide_context=True,
        )

        # To be implemented by the customer.
        # Timestamp needs to be saved for next run
        task_3 = DummyOperator(task_id='save_hwm')

    end = DummyOperator(task_id='end')

    start >> extract_upload >> end