About Collectors
Pre-requisites
Collector Server Minimum Requirements
Snowflake Requirements
-
Access to Snowflake (see section below)
Snowflake Access
Create a Snowflake user with read access to following views in the Snowflake database.
-
account_usage.history
-
account_usage.views
-
account_usage.tables
-
account_usage.columns
-
account_usage.copy_history
-
account_usage.grants_to_roles
-
account_usage.grants_to_users
-
account_usage.schemata
-
account_usage.databases
-
account_usage.policy_references
-
account_usage.access_history (If you have Enterprise Edition)
Ability to run
-
SHOW STREAMS IN ACCOUNT
-
SHOW PRIMARY KEYS IN ACCOUNT
To create a user with general access to metadata available in Snowflake Account Usage schema
--Log in with a user that has the permissions to create a role/user

--Create a new role for the Catalog user
Create role CATALOG_READ_ONLY;

--Grant the role access to the Account usage schema
grant imported privileges on database Snowflake to CATALOG_READ_ONLY;
grant select on all tables in schema SNOWFLAKE.ACCOUNT_USAGE to CATALOG_READ_ONLY;
grant monitor on account to role CATALOG_READ_ONLY;

--Create a new user for K and grant it the role (remove the [])
create user [kada_user] password=['abc123!@#'] default_role = CATALOG_READ_ONLY default_warehouse = [warehouse];
To create a user with specific access to metadata in Snowflake Account Usage, you will need to create a new Snowflake database with views that select from the Snowflake database. This is a known Snowflake limitation.
--Log in with a user that has the permissions to create a role/user

-- create a new database
create database CATALOG_METADATA;

-- create a new schema
create schema CATALOG_METADATA.ACCOUNT_USAGE;

— account_usage.access_history
create view CATALOG_METADATA.ACCOUNT_USAGE.ACCESS_HISTORY
    as select * from SNOWFLAKE.ACCOUNT_USAGE.ACCESS_HISTORY;

-- account_usage.views
create view CATALOG_METADATA.ACCOUNT_USAGE.VIEWS
    as select * from SNOWFLAKE.ACCOUNT_USAGE.VIEWS;

-- account_usage.tables
create view CATALOG_METADATA.ACCOUNT_USAGE.TABLES
    as select * from SNOWFLAKE.ACCOUNT_USAGE.TABLES;

-- account_usage.columns
create view CATALOG_METADATA.ACCOUNT_USAGE.COLUMNS
    as select * from SNOWFLAKE.ACCOUNT_USAGE.COLUMNS;

-- account_usage.copy_history
create view CATALOG_METADATA.ACCOUNT_USAGE.COPY_HISTORY
    as select * from SNOWFLAKE.ACCOUNT_USAGE.COPY_HISTORY;

-- account_usage.grant_to_roles
create view CATALOG_METADATA.ACCOUNT_USAGE.GRANTS_TO_ROLES
    as select * from SNOWFLAKE.ACCOUNT_USAGE.GRANTS_TO_ROLES;

-- account_usage.grant_to_grant_to_users
create view CATALOG_METADATA.ACCOUNT_USAGE.GRANTS_TO_USERS
    as select * from SNOWFLAKE.ACCOUNT_USAGE.GRANTS_TO_USERS;

-- account_usage.schemata
create view CATALOG_METADATA.ACCOUNT_USAGE.SCHEMATA
    as select * from SNOWFLAKE.ACCOUNT_USAGE.SCHEMATA;

-- account_usage.databases
create view CATALOG_METADATA.ACCOUNT_USAGE.DATABASES
    as select * from SNOWFLAKE.ACCOUNT_USAGE.DATABASES;

-- account_usage.policy_references
create view CATALOG_METADATA.ACCOUNT_USAGE.POLICY_REFERENCES
    as select * from SNOWFLAKE.ACCOUNT_USAGE.POLICY_REFERENCES;

-- account_usage.access_history
create view CATALOG_METADATA.ACCOUNT_USAGE.ACCESS_HISTORY
    as select * from SNOWFLAKE.ACCOUNT_USAGE.ACCESS_HISTORY;

-- create a new role
create role CATALOG_READ_ONLY;

-- grant access for the role to a warehouse and the database and schema created
grant usage on warehouse [MY_WAREHOUSE] to role CATALOG_READ_ONLY;
grant usage, monitor on database CATALOG_METADATA to role CATALOG_READ_ONLY;
grant usage, monitor on schema CATALOG_METADATA.ACCOUNT_USAGE to role CATALOG_READ_ONLY;
grant select on all views in schema CATALOG_METADATA.ACCOUNT_USAGE to CATALOG_READ_ONLY;
grant select on future views in schema CATALOG_METADATA.ACCOUNT_USAGE to CATALOG_READ_ONLY;

-- create a new Kada user
create user [kada_user] password=[‘<add password>’] default_role = CATALOG_READ_ONLY default_warehouse = [warehouse];
If you wish for K to catalog Dynamic Tables, individual monitor access at a database level is required.
GRANT MONITOR ON ALL DYNAMIC TABLES IN DATABASE {database_1} TO ROLE CATALOG_READ_ONLY;
GRANT MONITOR ON ALL DYNAMIC TABLES IN DATABASE {database_2} TO ROLE CATALOG_READ_ONLY
From the above record down the following to be used for the setup
-
User name / Password
-
Role
-
Warehouse
-
(If creating a new database for metadata) Database name
-
Snowflake account (found in the URL of your Snowflake instance - between https:// and .snowflakecomputing.com/…)
Authentication Methods
Key-Pair Authentication
If you want to connect to Snowflake via Key Pair Authentication, follow these steps https://docs.snowflake.com/en/user-guide/key-pair-auth#step-1-generate-the-private-key and attach the key to the user you created.
Entra OAuth Connection
Follow the instructions here to setup your Snowflake environment for Entra OAuth Setting Up External OAuth Token Using Azure AD For OAuth Client
Step 1: Create the Source in K
Create a Snowflake source in K
-
Go to Settings, Select Sources and click Add Source
-
Select “Load from File” option
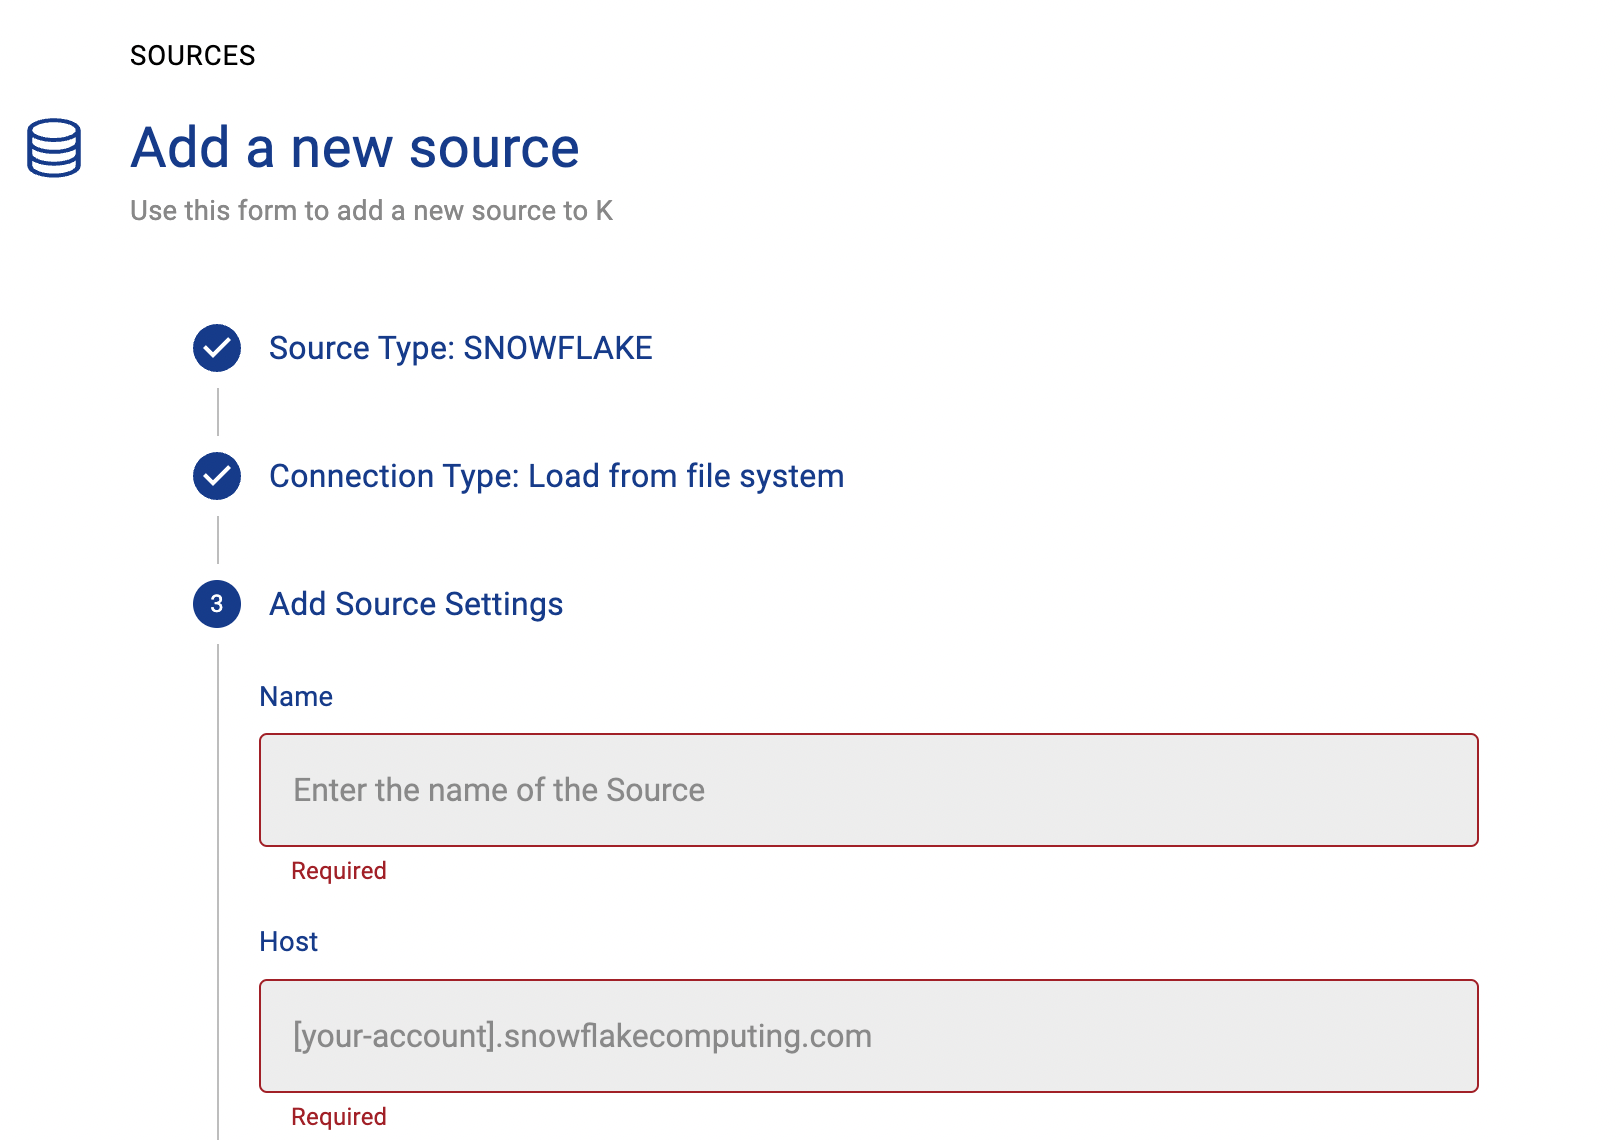
-
Give the source a Name - e.g. Snowflake Production
-
Add the Host name for the Snowflake Server
-
Click Finish Setup
Step 2: Getting Access to the Source Landing Directory
Step 3: Install the Collector
It is recommended to use a python environment such as pyenv or pipenv if you are not intending to install this package at the system level.
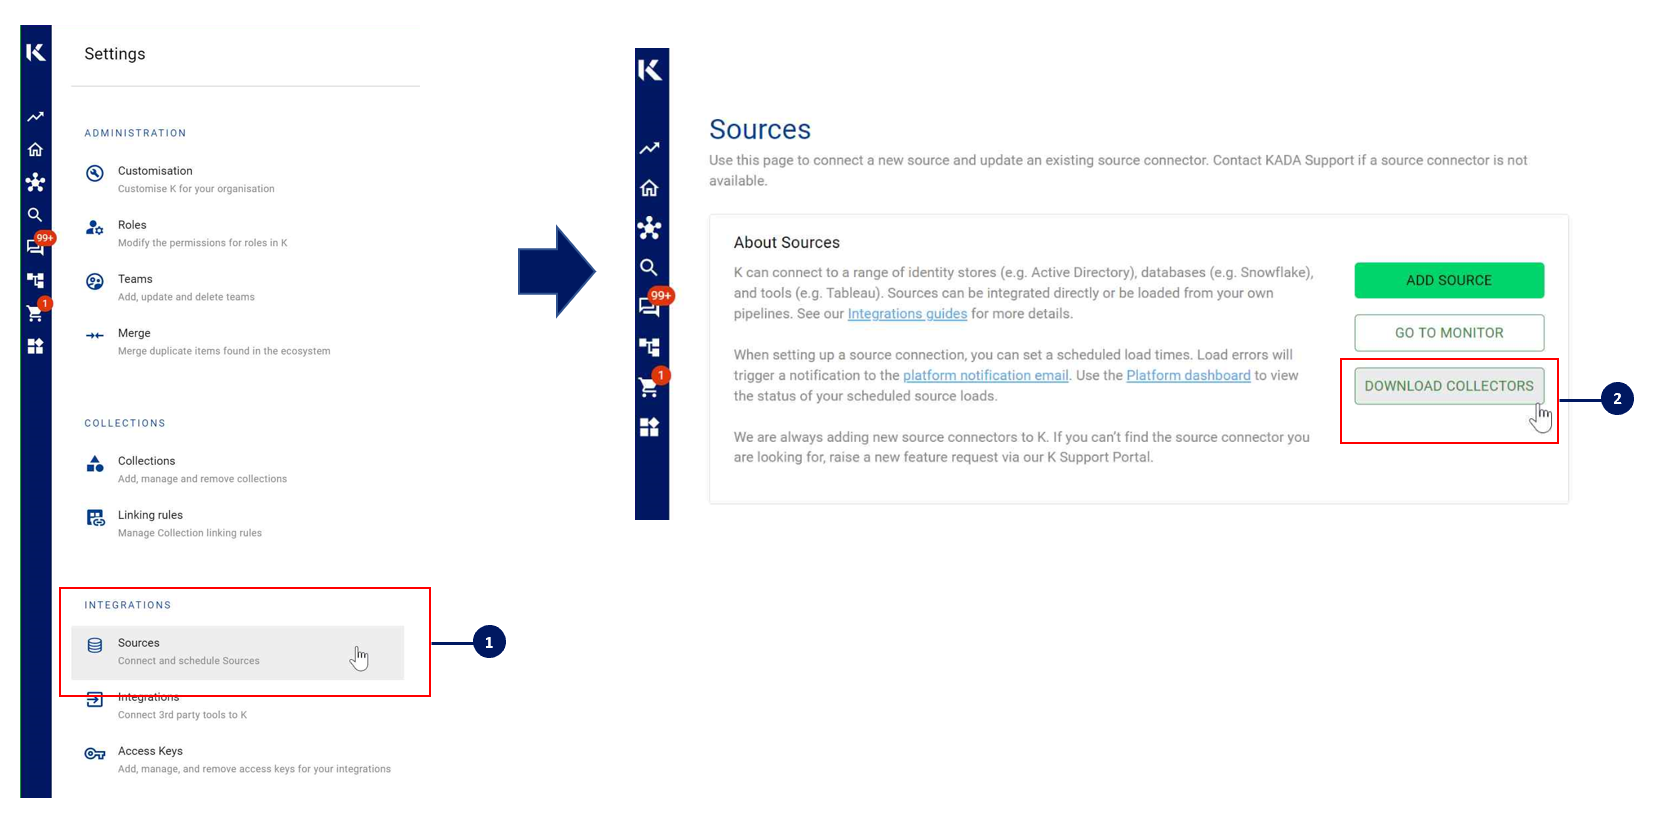
You can download the latest Core Library and Snowflake whl via Platform Settings → Sources → Download Collectors
Run the following command to install the collector.
pip install kada_collectors_extractors_<version>-none-any.whl
You will also need to install the latest common library kada_collectors_lib for this collector to function properly.
pip install kada_collectors_lib-<version>-none-any.whl
Some python packages also have dependencies on the OS level packages, so you may be required to install additional OS packages if the below fails to install. These are some known possible packages you may require depending on your OS, this is not exhaustive and only serves as a guide.
|
OS |
Packages |
|---|---|
|
CentOS |
libffi-devel
|
|
Ubuntu |
libssl-dev
|
Please also see https://docs.snowflake.com/en/user-guide/python-connector-install.html
Step 4: Configure the Collector
The collector requires a set of parameters to connect to and extract metadata from Snowflake
|
FIELD |
FIELD TYPE |
DESCRIPTION |
EXAMPLE |
|---|---|---|---|
|
account |
string |
Snowflake account |
“abc123.australia-east.azure” |
|
username |
string |
Username to log into the snowflake account, if use_private_key is true, this must be the user associated to the private key |
|
|
password |
string |
Password to log into the snowflake account, if use_private_key is true then this is the password/passphrase to that private key, if your private key for some reason is NOT encrypted, then you can leave this blank. |
|
|
information_database |
string |
Database where all the required tables are located, generally this is snowflake or use the database created in Step 1 |
“snowflake” |
|
role |
string |
The role to access the required account_usage tables, generally this is accountadmin |
“accountadmin” |
|
warehouse |
string |
The warehouse to execute the queries against |
“xs_analytics” |
|
databases |
list<string> |
A list of databases to extract from Snowflake |
[“dwh”, “adw”] |
|
login_timeout |
integer |
The max amount of time in seconds allowed for the extractor to establish and authenticate a connection, generally 5 is sufficient but if you have a slow network you can increase this up to 20 |
5 |
|
output_path |
string |
Absolute path to the output location where files are to be written |
“/tmp/output” |
|
mask |
boolean |
To enable masking or not |
true |
|
compress |
boolean |
To gzip the output or not |
true |
|
use_private_key |
boolean |
To use private key or not |
true |
|
private_key |
string |
The private key value as text. The key requires formatting
|
|
|
host |
string |
The host value for snowflake that was onboarded in K |
“abc123.australia-east.azure.snowflakecomputing.com” |
|
enterprise |
boolean |
Do you have snowflake Enterprise Edition? |
false |
|
meta_only |
boolean |
To extract metadata only or not, note as of this current version only metadata can be extracted regardless of this value |
false |
|
use_oauth |
boolean |
To use Entra OAuth login or not |
true |
|
oauth_token_url |
string |
Full URL to generate token based on OAuth provider (Entra, Okta, Ping) |
For Entra: https://login.microsoftonline.com/abc0de12-xxxx-xxxx-xxxx-345678fg9102/oauth2/v2.0/token |
|
client_id |
string |
Application ID of client app registration |
abc0de12-xxxx-xxxx-xxxx-345678fg9102 |
|
client_secret |
string |
Client Secret of client app registration |
|
|
oauth_scope |
string |
Application ID URI of server app registration |
api://xxxx/.default |
|
kada_tag |
string |
Set ‘NONE’ to bring in all objects regardless of tags. Set ‘EXCLUDE’ to filter out objects tagged KADA=EXCLUDE inside your Snowflake environment. Set ‘INCLUDE’ to return only objects tagged KADA=INCLUDE inside your Snowflake environment. |
‘NONE’ |
These parameters can be added directly into the run or you can use pass the parameters in via a JSON file. The following is an example you can use that is included in the example run code below.
kada_snowflake_extractor_config.json
{
    "account": "",
    "username": "",
    "password": "",
    "information_database": "",
    "role": "",
    "warehouse": "",
    "databases": [],
    "login_timeout": 5,
    "output_path": "/tmp/output",
    "mask": true,
    "compress": true
    "use_private_key": false,
    "private_key": "",
    "host": "",
    "use_oauth": false,
    "oauth_token_url": "",
    "client_id": "",
    "client_secret": "",
    "oauth_scope": "",
    "enterprise": false,
    "meta_only": false,
    "kada_tag": ""
}
Step 5: Run the Collector
The following code is an example of how to run the extractor. You may need to uplift this code to meet any code standards at your organisation.
This can be executed in any python environment where the whl has been installed.
This is the wrapper script: kada_snowflake_extractor.py
import os
import argparse
from kada_collectors.extractors.utils import load_config, get_hwm, publish_hwm, get_generic_logger
from kada_collectors.extractors.snowflake import Extractor

get_generic_logger('root') # Set to use the root logger, you can change the context accordingly or define your own logger

_type = 'snowflake'
dirname = os.path.dirname(__file__)
filename = os.path.join(dirname, 'kada_{}_extractor_config.json'.format(_type))

parser = argparse.ArgumentParser(description='KADA Snowflake Extractor.')
parser.add_argument('--config', '-c', dest='config', default=filename, help='Location of the configuration json, default is the config json in the same directory as the script.')
parser.add_argument('--name', '-n', dest='name', default=_type, help='Name of the collector instance.')
args = parser.parse_args()

start_hwm, end_hwm = get_hwm(args.name)

ext = Extractor(**load_config(args.config))
ext.test_connection()
ext.run(**{"start_hwm": start_hwm, "end_hwm": end_hwm})

publish_hwm(args.name, end_hwm)
If your organisation has a proxy operating on where this script runs and you are using an private link for snowflake you may encounter an issue resulting in a 403 error when fetching result batches.
In such a scenario this is due to the private link not requiring a proxy but the s3 data fetch which snowflake uses requires a proxy, you will need to set the following.
export HTTP_PROXY=”http://username:password@proxyserver.company.com:80”
export HTTPS_PROXY=”http://username:password@proxyserver.company.com:80”
Then explicitly call out snowflake itself to not use a proxy
export NO_PROXY=”.snowflakecomputing.com”
On a windows setup you would use “set” instead of “export” in the command line.
Advance options:
If you wish to maintain your own high water mark files elsewhere you can use the above section’s script as a guide on how to call the extractor. The configuration file is simply the keyword arguments in JSON format. Refer to this document for more information Collector Integration General Notes
If you are handling external arguments of the runner yourself, you’ll need to consider additional items for the run method. Refer to this document for more information Collector Integration General Notes
from kada_collectors.extractors.snowflake import Extractor

kwargs = {my args} # However you choose to construct your args
hwm_kwrgs = {"start_hwm": "end_hwm": } # The hwm values

ext = Extractor(**kwargs)
ext.run(**hwm_kwrgs)
class Extractor(
    account: str=None,
    username: str=None,
    password: str=None,
    use_private_key: bool=False,
    private_key: str=None,
    use_oauth: bool=False,
    oauth_token_url: str=None,
    client_id: str=None,
    client_secret: str=None,
    oauth_scope: str=None,
    databases: list=[],
    information_database: str='snowflake',
    role: str='accountadmin',
    output_path: str='./output',
    warehouse: str=None,
    login_timeout: int=5,
    mask: bool=False,
    compress: bool=False,
    host: str=None,
    enterprise: bool=True,
    meta_only: bool=False,
    kada_tag: str = None
    ) -> None)
account: snowflake account
username: username to sign into snowflake
password: password to sign into snowflake
information_database: database with snowflake level information
databases: list of databases to extract
role: role with access to the database with snowflake level information
output_path: full or relative path to where the outputs should go
warehouse: specify a different warehouse if required, otherwise the default will be used
login_timeout: The timeout for snowflake Auth
mask: To mask the META/DATABASE_LOG files or not
compress: To gzip output files or not
use_private_key: Using private/public RSA keys
private_key: the private key value in plain text not byte encoded
host: The host value onboarded in K
enterprise: Enterprise edition of snowflake
meta_only: To extract metadata only
use_oauth: use OAuth client credentials authentication
oauth_token_url: full OAuth token endpoint URL, e.g. https://login.microsoftonline.com/%7Btenant%7D/oauth2/v2.0/token or https://{okta-domain}/oauth2/default/v1/token (required when use_oauth=True)
client_id: OAuth client/application ID (required when use_oauth=True)
client_secret: OAuth client secret (required when use_oauth=True)
oauth_scope: OAuth scope to request; defaults to <https://<account>>.snowflakecomputing.com/.default
kada_tag: ‘NONE’ to bring in all objects regardless of tags, ‘EXCLUDE’ to filter out objects tagged KADA=EXCLUDE, ‘INCLUDE’ to return only objects tagged KADA=INCLUDE
Step 6: Check the Collector Outputs
K Extracts
A set of files (eg metadata, databaselog, linkages, events etc) will be generated. These files will appear in the output_path directory you set in the configuration details
High Water Mark File
A high water mark file is created in the same directory as the execution called snowflake_hwm.txt and produce files according to the configuration JSON. This file is only produced if you call the publish_hwm method.
Step 7: Push the Extracts to K
Once the files have been validated, you can push the files to the K landing directory.
You can use Azure Storage Explorer if you want to initially do this manually. You can push the files using python as well (see Airflow example below)
Example: Using Airflow to orchestrate the Extract and Push to K