
Updated in Version 6.1
Overview
Previously, adding tables or columns to a List in K meant searching for and adding objects one at a time through the Add to List function or using search and the bulk action option. This is manageable for a handful of objects or have an effective search term, but impractical when you need to add dozens or hundreds of objects that are not easily linked by search.
List Builder lets you paste a list of fully qualified table or column names, validate them against K in one operation, and hand the matched objects off to the existing Bulk Action workflow — for example, to run an Impact Assessment.
Who this is for: Anyone who needs to build a large List quickly and already has a list of objects to add (e.g. a list in excel).
What you'll need: A list of fully qualified table or column names (e.g., from a spreadsheet), and knowledge of which source (database) they belong to.
Before You Start
Make sure your object names follow the required format:
|
Object type |
Format |
Example |
|---|---|---|
|
Table |
|
|
|
Column |
|
|
A few things to know before you paste:
-
Matching is case-insensitive —
prod_dw.public.customerswill matchPROD_DW.PUBLIC.CUSTOMERSin K. -
Each name should be on its own line (comma-separated lists aren't supported in this version).
-
Blank lines and extra leading/trailing spaces are automatically ignored/trimmed — no need to clean these up yourself.
-
Duplicate names: if the same name appears more than once, only the first occurrence will be matched — the rest will be rejected as duplicates.
Step-by-Step Guide
Step 1: Open the List Builder modal
Click on Applications in the navigation menu and open List Builder.
Step 2: Select a source
In the first column, select the source (database) your objects belong to.
-
All sources registered in K are listed.
-
Use the search field at the top of the column to filter the list if you have many sources.
-
Click a source to select it
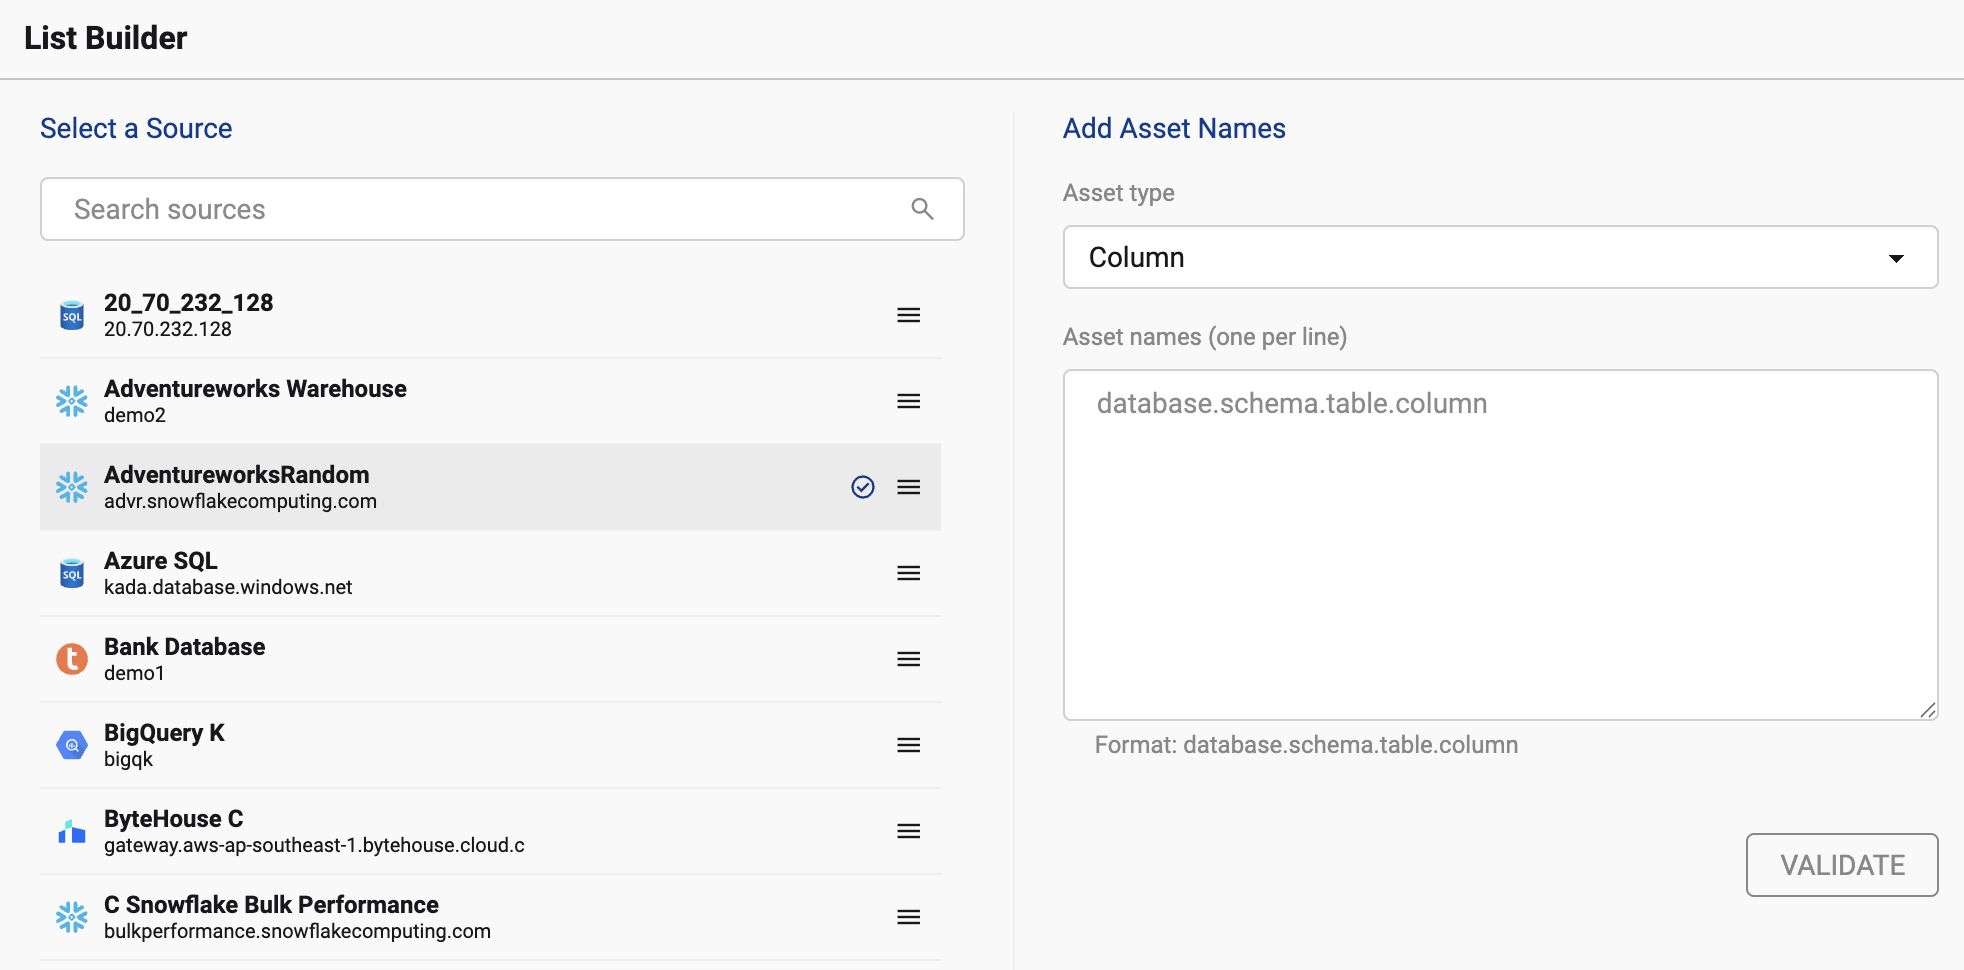
Step 3: Choose an object type and paste your names
In the second column:
-
Use the Object Type dropdown to choose Table or Column. This is required.
-
Paste your list of names into the text area, one name per line.
-
The text area shows a format hint as placeholder text (e.g.,
db.schema.table_name), which clears as soon as you click into it so you can type or paste fresh names. -
A format reminder is also shown below the text area:
db.schema.tablefor tables,db.schema.table.columnfor columns.
-
Step 4: Validate
Click Validate to check your pasted names against K.
During validation, K will:
-
Parse each line as a separate entry and trim whitespace.
-
Skip empty lines.
-
Check that each name has the correct number of segments for the selected object type (3 for Table, 4 for Column).
-
Look up each name against K within the selected source (case-insensitive).
-
Flag duplicate entries.
-
Flag objects that are already on the current list, if you opened List Builder from a specific list.
Step 5: Review the results
The third column shows your validation results:
-
Before validation, this column shows an empty state with an icon and message.
-
After validation, you'll see an inline count of how many names matched and how many were rejected.
-
All matched: a success icon and confirmation message.
-
Any rejected: a read-only text area listing the rejected names (raw names only — no rejection reasons are shown inline), plus a hint summarizing the outcome.
-
To copy the rejected names: click the Copy button in the top-right corner of the rejected list. The button will briefly show "Copied" to confirm, and the raw names are copied to your clipboard so you can investigate or fix them (e.g., check spelling, confirm the object exists in K, or check for typos in the source).
Step 6: Continue to Bulk Action
Depending on your results, the footer button will show one of the following:
|
Result |
Button |
What happens |
|---|---|---|
|
All names matched |
Continue |
Proceeds to Bulk Action Step 1 with all objects pre-filled. |
|
Some names matched |
Continue with N matched |
Proceeds with only the matched objects; you can go back and fix the rejected ones first if you prefer. |
|
No names matched |
(Continue is disabled) |
Fix your input and re-validate before you can proceed. |
Clicking Continue takes you to the existing Bulk Action UI with the action set to add to "List" and your object scope already filled in. From there, you can:
-
Add the objects to an existing List, or
-
Create a new List.
You can use this screen for different action not just to add to list
Complete your bulk action setup to take action on your list of assets.
Tips for Common Issues
|
Issue |
Likely cause |
What to do |
|---|---|---|
|
A name is rejected as "invalid format" |
Wrong number of dot-separated segments (should be 3 for tables, 4 for columns) |
Check for missing/extra segments, e.g. |
|
A name is rejected even though it looks correct |
The object may not exist in K under the selected source, or there's a typo |
Double-check spelling and confirm the object exists in K under that source |
|
A name is rejected as a duplicate |
The same name appears more than once in your pasted list |
Only the first occurrence is kept; remove the duplicate line if you don't need it |
|
Continue button is disabled |
No names matched validation |
Review and fix your rejected names, then re-validate |
|
Validate button is disabled |
No source selected, no object type chosen, or the names text area is empty |
Make sure all three inputs (source, type, names) are filled in |
Current Limitations
-
This release supports Table and Column object types only.
-
You can only paste text — file/CSV upload is not supported.
-
List Builder validates against existing objects only — it can't create new objects in K.