This page will walkthrough the setup of Great Expectations (self hosted) in K using the direct connect method.
Integration details
|
Scope |
Included |
Comments |
|---|---|---|
|
Metadata |
YES |
See limitations below |
|
Tests |
YES |
Expectation results are captured |
|
Lineage |
YES |
Linkages to targets are captured |
Inferred data connectors for databases are currently supported. SQL run time data connectors for databases will be added in upcoming sprints.
Spark data connectors for files are not supported.
Step 1) Results from Great Expectations
-
After setting up and scheduling your Great Expectations checkpoints, you need to:
-
Update the expectation results to be uniquely named
-
Configure the results to be pushed to the landing folder created in Step 3
-
A GE plugin is available from Kada that can simplify the above process. Please reach out to support@kada.ai to find out more.
Step 2) Add Great Expectations as a New Source
-
Select Platform Settings in the side bar
-
In the pop-out side panel, under Integrations click on Sources
-
Click Add Source and select Great Expectations
-
Select Load from File and add your Great Expectations details and click Next
-
Fill in the Source Settings and click Next
-
Name: Give the Great Expectations instance a name in K
-
Host: Enter the Great Expectations server name
-
-
Click Finish Setup
Step 3) Configure the Great Expectations extracts
-
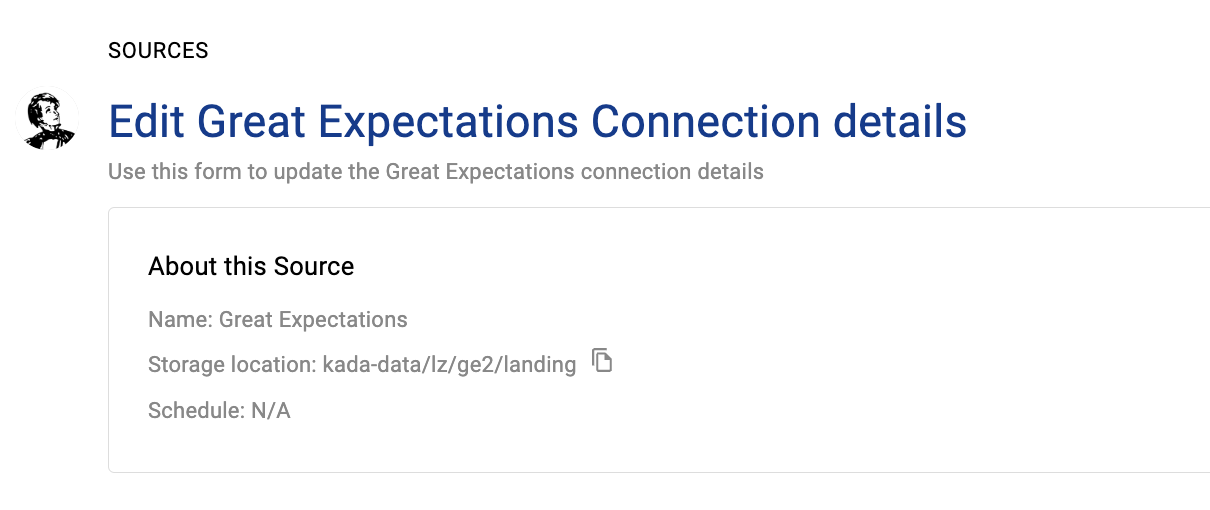
Click Edit on the Great Expectations source you just created
-
Note down the storage location
-
Schedule the Great Expectations results to land in this directory.
For details about how to push files to landing — see the Collectors documentation.
Step 4) Schedule the Great Expectations source load
-
Select Platform Settings in the side bar
-
In the pop-out side panel, under Integrations click on Sources
-
Locate your new Great Expectations source and click on the Schedule Settings (clock) icon to set the schedule
Step 5) Manually run an ad hoc load to test the Great Expectations setup
-
Select Platform Settings in the side bar
-
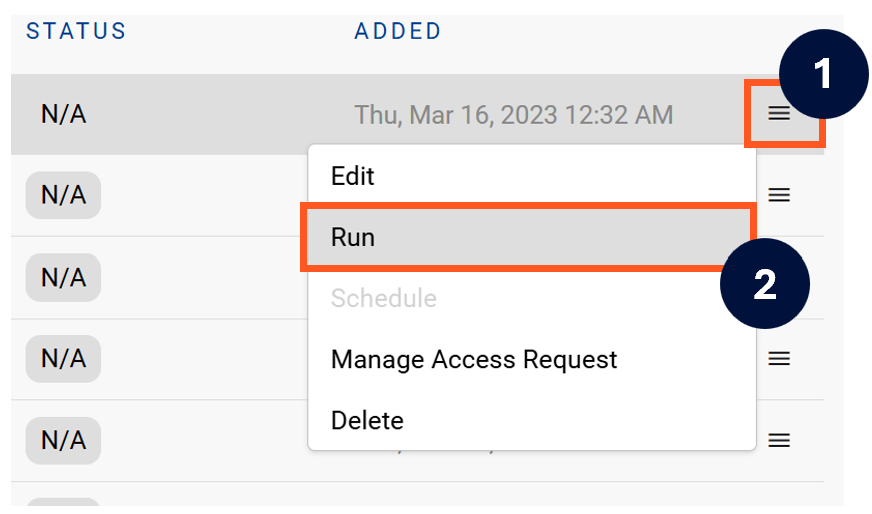
In the pop-out side panel, under Platform Settings click on Sources
-
Next to the Source click on the menu icon and select Run
-
After the manual run is triggered, a pop up bar will appear containing a link that can take you to the Monitor tab where you can check the progress of the job.
Troubleshooting failed loads
-
If the job failed at the extraction step
-
Check the error. Contact KADA Support if required.
-
Rerun the source job
-
-
If the job failed at the load step, the landing folder failed directory will contain the file with issues.
-
Find the bad record and fix the file
-
Rerun the source job
-