This page will guide you through the setup of Snowflake in K using the direct connect method.
Integration details
|
Scope |
Included |
Comments |
|---|---|---|
|
Metadata |
YES |
See below for know limitations |
|
Lineage |
YES |
|
|
Usage |
YES |
|
|
Sensitive Data Scanner |
YES |
|
Known limitations
-
Streams & Tasks are not currently included in the metadata extracted from Snowflake. Currently under review.
-
Access roles only consider grants to users. Access roles do not consider grants to other roles.
Step 1) Establish Snowflake Access
K only needs access to metadata tables in Snowflake. These tables are stored in the "Snowflake" database. You do not need to provide K access to any data stored in your Snowflake database.
Create a Snowflake user with read access to the following views in the Snowflake database:
-
account_usage.history
-
account_usage.views
-
account_usage.tables
-
account_usage.columns
-
account_usage.copy_history
-
account_usage.grants_to_roles
-
account_usage.grants_to_users
-
account_usage.schemata
-
account_usage.databases
-
account_usage.policy_references
Ability to run:
-
SHOW STREAMS IN ACCOUNT
-
SHOW PRIMARY KEYS IN ACCOUNT
There are 2 options to create this user. Pick one approach that best suits your needs.
Option 1: Creating a user with access to Snowflake Account Usage Schema
To create a user with general access to metadata available in Snowflake Account Usage schema:
--Log in with a user that has the permissions to create a role/user

--Create a new role for the Catalog user
Create role CATALOG_READ_ONLY;

--Grant the role access to the Account usage schema
grant imported privileges on database Snowflake to CATALOG_READ_ONLY;
grant select on all tables in schema SNOWFLAKE.ACCOUNT_USAGE to CATALOG_READ_ONLY;
grant monitor on account to role CATALOG_READ_ONLY;

--Create a new user for K and grant it the role (remove the [])
create user [kada_user] password=['abc123!@#'] default_role = CATALOG_READ_ONLY default_warehouse = [warehouse];
Option 2: Creating a user with access to specific views of Snowflake Account Usage Schema
To create a user with specific access to metadata in Snowflake Account Usage, you will need to create a new Snowflake database with views that select from the Snowflake database. This is a known Snowflake limitation.
--Log in with a user that has the permissions to create a role/user

-- create a new database
create database CATALOG_METADATA;

-- create a new schema
create schema CATALOG_METADATA.ACCOUNT_USAGE;

-- account_usage.access_history
create view CATALOG_METADATA.ACCOUNT_USAGE.ACCESS_HISTORY
    as select * from SNOWFLAKE.ACCOUNT_USAGE.ACCESS_HISTORY;

-- account_usage.views
create view CATALOG_METADATA.ACCOUNT_USAGE.VIEWS
    as select * from SNOWFLAKE.ACCOUNT_USAGE.VIEWS;

-- account_usage.tables
create view CATALOG_METADATA.ACCOUNT_USAGE.TABLES
    as select * from SNOWFLAKE.ACCOUNT_USAGE.TABLES;

-- account_usage.columns
create view CATALOG_METADATA.ACCOUNT_USAGE.COLUMNS
    as select * from SNOWFLAKE.ACCOUNT_USAGE.COLUMNS;

-- account_usage.copy_history
create view CATALOG_METADATA.ACCOUNT_USAGE.COPY_HISTORY
    as select * from SNOWFLAKE.ACCOUNT_USAGE.COPY_HISTORY;

-- account_usage.grant_to_roles
create view CATALOG_METADATA.ACCOUNT_USAGE.GRANTS_TO_ROLES
    as select * from SNOWFLAKE.ACCOUNT_USAGE.GRANTS_TO_ROLES;

-- account_usage.grant_to_grant_to_users
create view CATALOG_METADATA.ACCOUNT_USAGE.GRANTS_TO_USERS
    as select * from SNOWFLAKE.ACCOUNT_USAGE.GRANTS_TO_USERS;

-- account_usage.schemata
create view CATALOG_METADATA.ACCOUNT_USAGE.SCHEMATA
    as select * from SNOWFLAKE.ACCOUNT_USAGE.SCHEMATA;

-- account_usage.databases
create view CATALOG_METADATA.ACCOUNT_USAGE.DATABASES
    as select * from SNOWFLAKE.ACCOUNT_USAGE.DATABASES;

-- account_usage.policy_references
create view CATALOG_METADATA.ACCOUNT_USAGE.POLICY_REFERENCES
    as select * from SNOWFLAKE.ACCOUNT_USAGE.POLICY_REFERENCES;

-- create a new role
create role CATALOG_READ_ONLY;

-- grant access for the role to a warehouse and the database and schema created
grant usage on warehouse [MY_WAREHOUSE] to role CATALOG_READ_ONLY;
grant usage, monitor on database CATALOG_METADATA to role CATALOG_READ_ONLY;
grant usage, monitor on schema CATALOG_METADATA.ACCOUNT_USAGE to role CATALOG_READ_ONLY;
grant select on all views in schema CATALOG_METADATA.ACCOUNT_USAGE to CATALOG_READ_ONLY;
grant select on future views in schema CATALOG_METADATA.ACCOUNT_USAGE to CATALOG_READ_ONLY;

-- create a new Kada user
create user [kada_user] password=['<add password>'] default_role = CATALOG_READ_ONLY default_warehouse = [warehouse];
Configuring User Authentication
Configure the user to use key-pair authentication (Recommended): see Snowflake Key Pair Auth documentation.
Or set the user type to be a legacy user if you wish to use only a Password for authentication (not recommended):
ALTER USER [kada_user] SET TYPE = LEGACY_SERVICE
From the above, record down the following to be used for the setup:
-
Kada user name
-
Password
-
Private Key (if configured)
-
Role
-
Warehouse
-
(If creating a new database for metadata) Database name
-
Snowflake account (found in the URL of your Snowflake instance — between https:// and .snowflakecomputing.com/…)
Step 2) Connecting K to Snowflake
-
Select Platform Settings in the side bar
-
In the pop-out side panel, under Integrations click on Sources
-
Click Add Source and select Snowflake
-
Select Direct Connect and add your Snowflake details and click Next
-
Fill in the Source Settings and click Next
-
Name: The name you wish to give your Snowflake DB in K
-
Host: Add your Snowflake Account (found in your Snowflake URL). Omit the https:// from the URL.
-
Information Database Role: Add the role the user should use
-
Information Database: Default is Snowflake if using Snowflake DB. Otherwise enter the Database created to store metadata views from Step 1
-
Warehouse: Add the warehouse the user should use
-
Enable data masking (optional): Select this option if you wish K to mask literals in Snowflake code objects.
-
Enterprise (optional): Select this option to leverage Enterprise features such as Object dependencies that improve lineage coverage
-
Use Key Pair Authentication (optional): Select this option if the Snowflake user is configured for key pair authentication
-
-
Add the Connection details and click Save & Next when connection is successful
-
Snowflake account: Use the account information part of your Snowflake account. Do not include snowflakecomputing.com
-
Username: Add the Snowflake user name
-
Password: Add the Snowflake user password
-
Private key: Add the Private key for the Snowflake user (if using key pair authentication)
-
-
Test your connection and click Save
-
Select the Databases you wish to load into K and click Finish Setup
-
All databases will be listed. If you have a lot of databases this may take a few seconds to load.
-
-
Return to the Sources page and locate the new Snowflake source that you loaded
-
Click on the clock icon to select Edit Schedule and set your preferred schedule for the Snowflake load
Note that scheduling a source can take up to 15 minutes to propagate the change.
Step 3) Manually run an ad hoc load to test Snowflake setup
-
Select Platform Settings in the side bar
-
In the pop-out side panel, under Platform Settings click on Sources
-
Next to the Source click on the menu icon and select Run
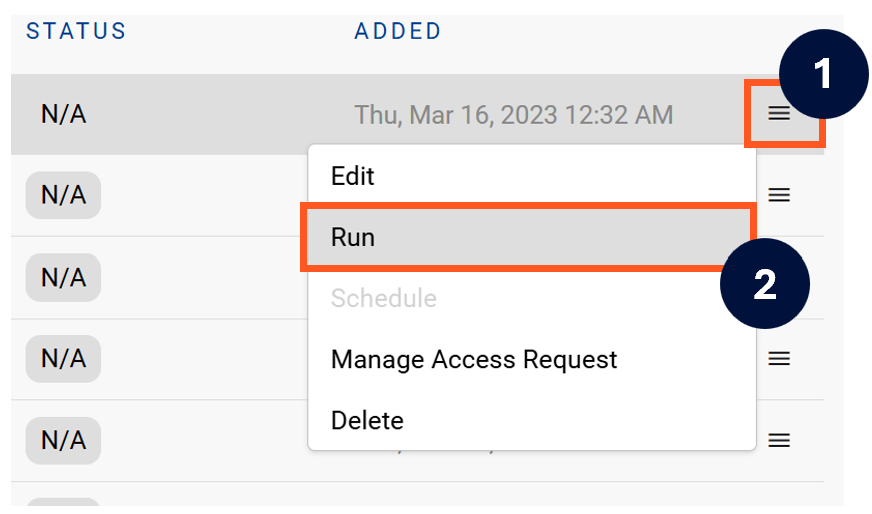
-
After the manual run is triggered, a pop up bar will appear containing a link that can take you to the Monitor tab where you can check the progress of the job.
Troubleshooting failed loads
-
If the job failed at the extraction step
-
Check the error. Contact KADA Support if required.
-
Rerun the source job
-
-
If the job failed at the load step, the landing folder failed directory will contain the file with issues.
-
Find the bad record and fix the file
-
Rerun the source job
-